Installable Features Configuration Guide
This guide will help you configure various third-party integrations and features available in LMSZAI. Each section provides step-by-step instructions to set up these features successfully.
Social Login (Google)
Overview: Google Social Login allows users to register and log in to your LMS platform using their Google accounts. This feature simplifies the registration process and improves user experience by eliminating the need for users to create separate accounts.
Benefits: - Faster user registration and login - Reduced password-related support issues - Improved user conversion rates - Enhanced security through Google's authentication
Prerequisites
- A Google account
- Access to Google Cloud Console
- Admin access to your LMSZAI installation
Configuration Steps
Step 1: Access Admin Settings
- Log in to your LMSZAI admin panel
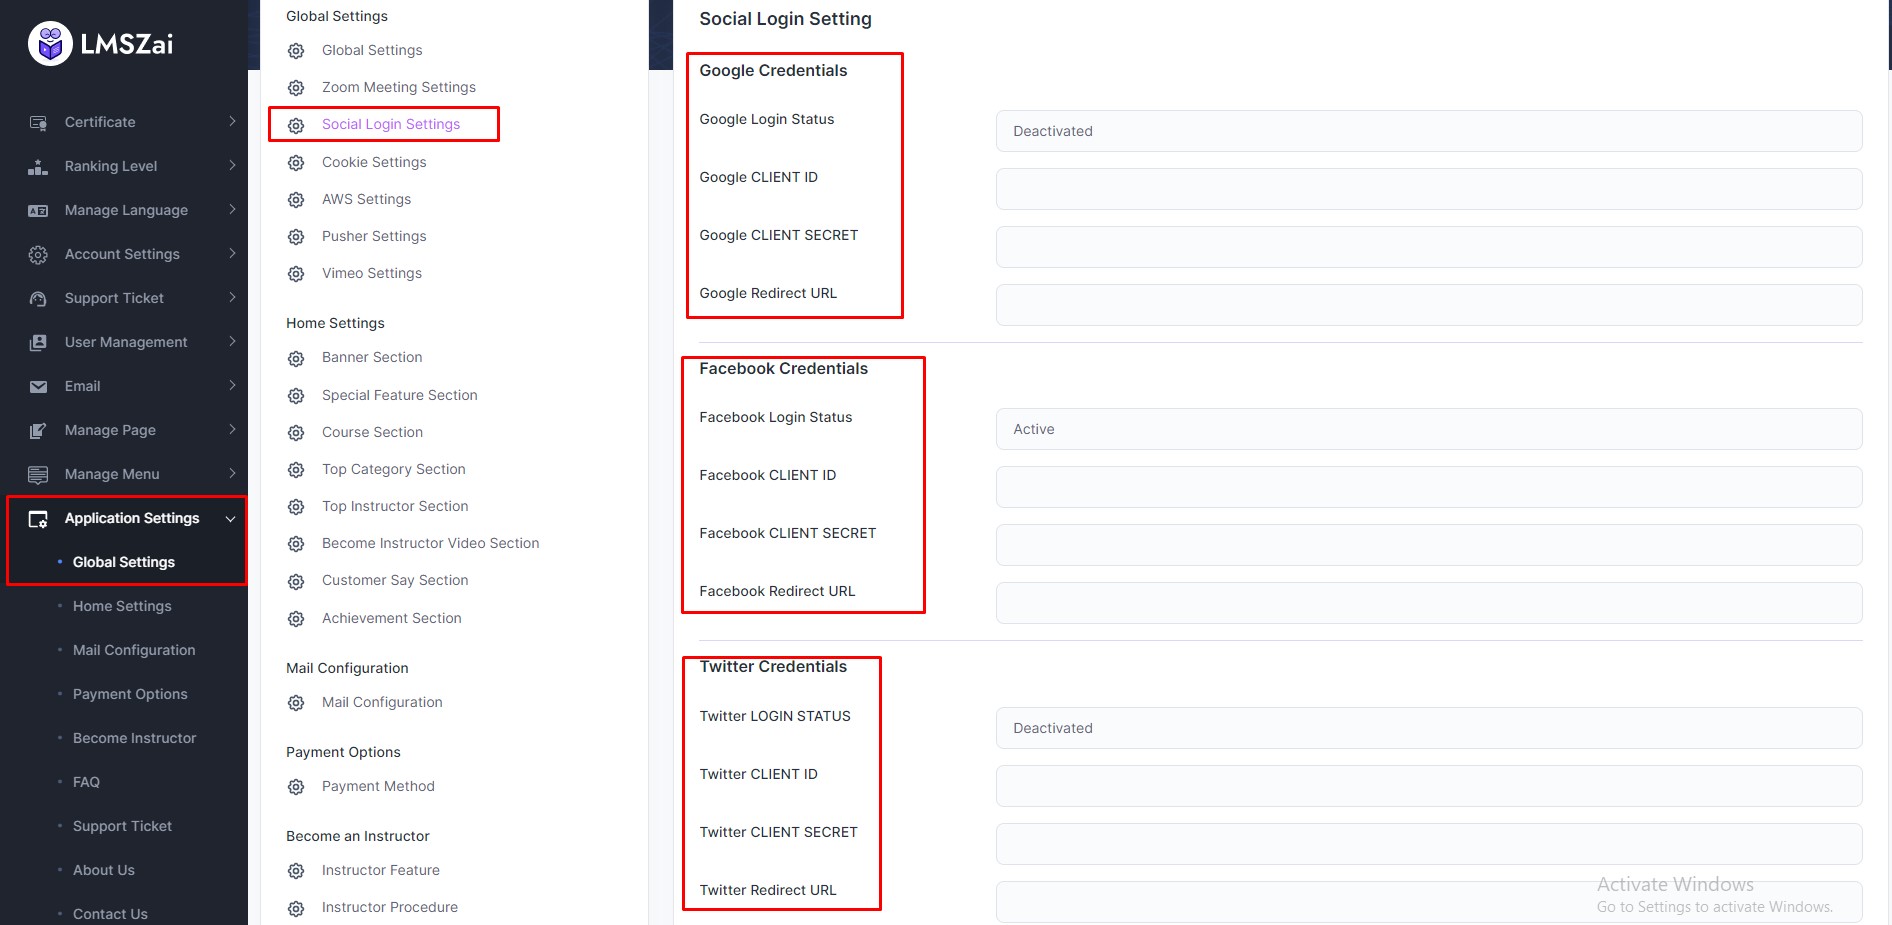
- Navigate to Application Settings → Global Settings → Social Login Settings
- Locate the Google Login configuration section
Step 2: Create Google Cloud Project
- Visit Google Cloud Console
- Sign in with your Google account
- Click on the project dropdown at the top of the page
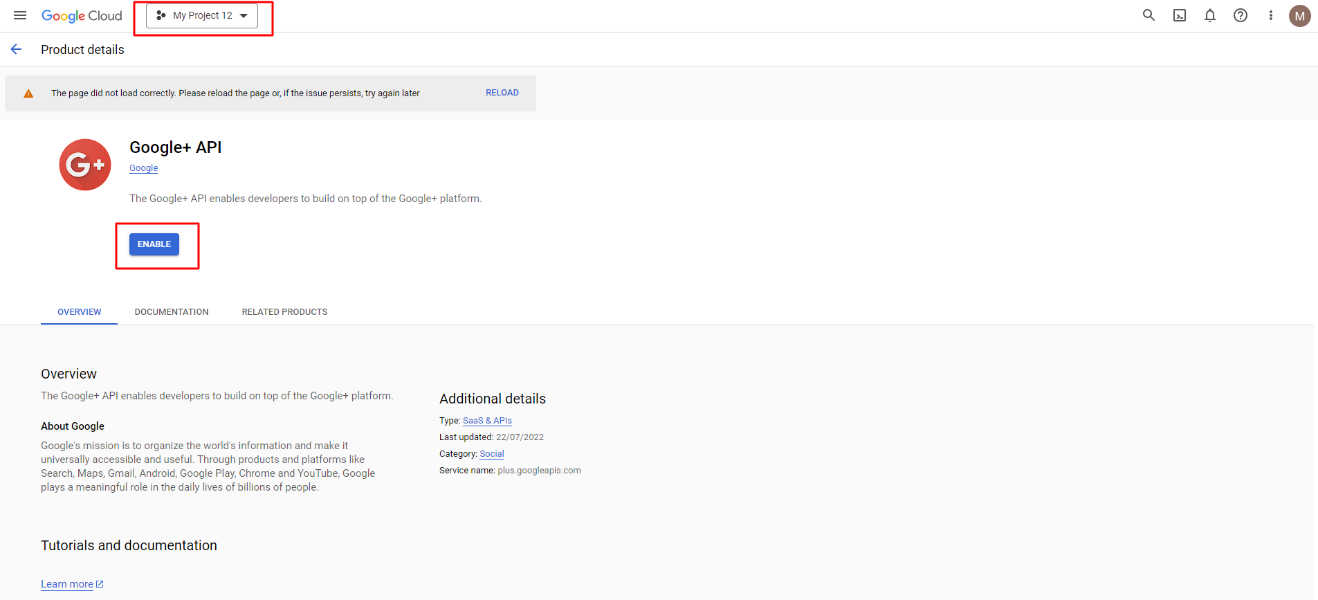
Step 3: Enable Google+ API
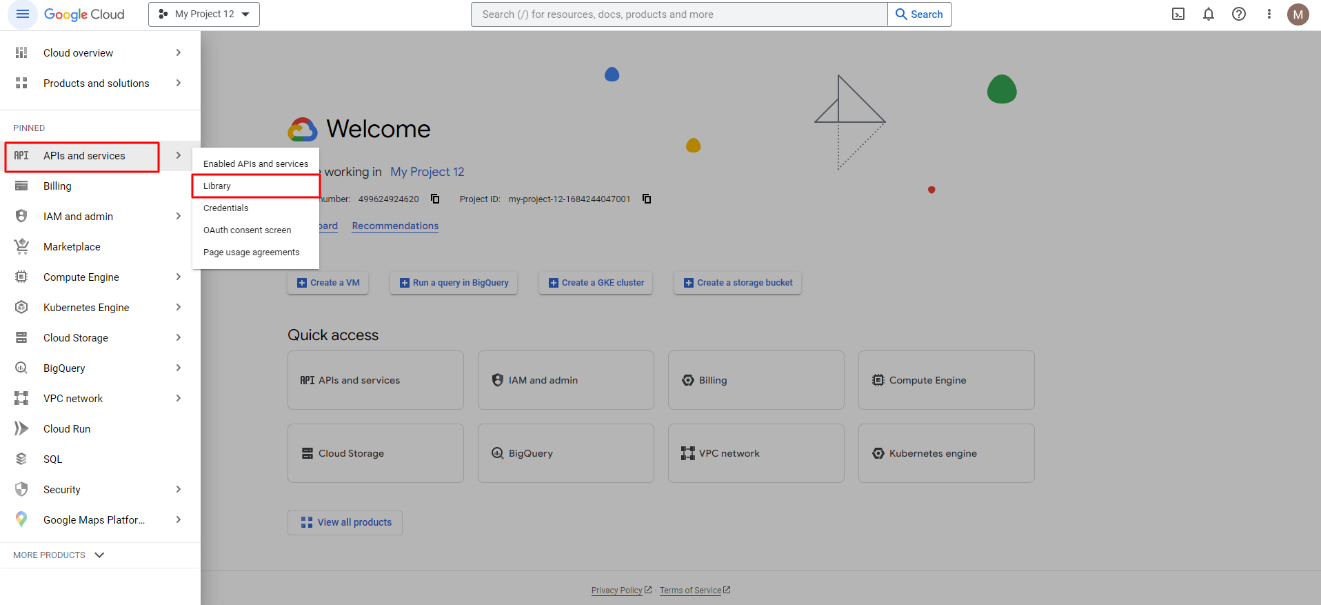
- Click on the menu icon (☰) in the top-left corner
- Navigate to APIs & Services → Library
- Search for "Google+ API" in the library
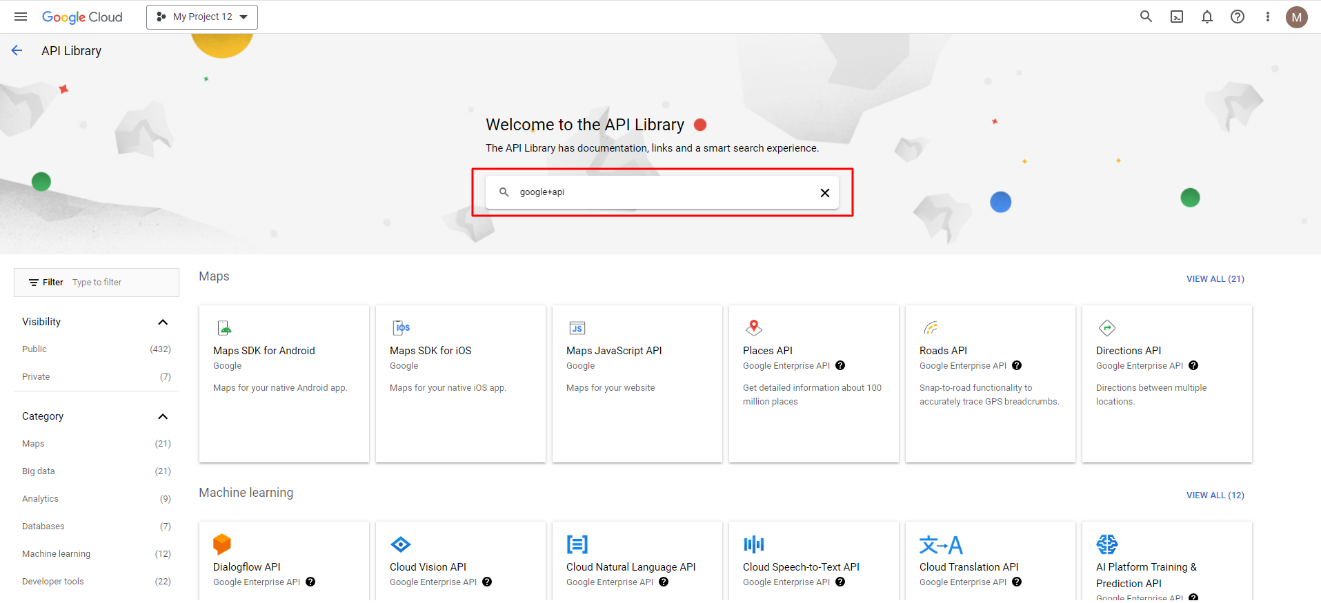
- Click on Google+ API from the search results
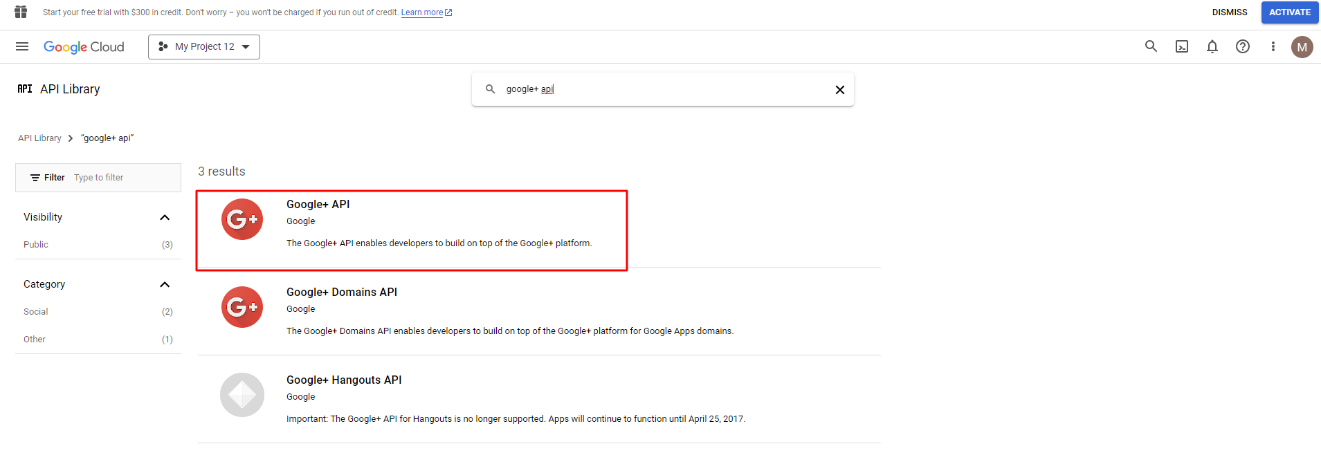
- Click the Enable button to activate the API
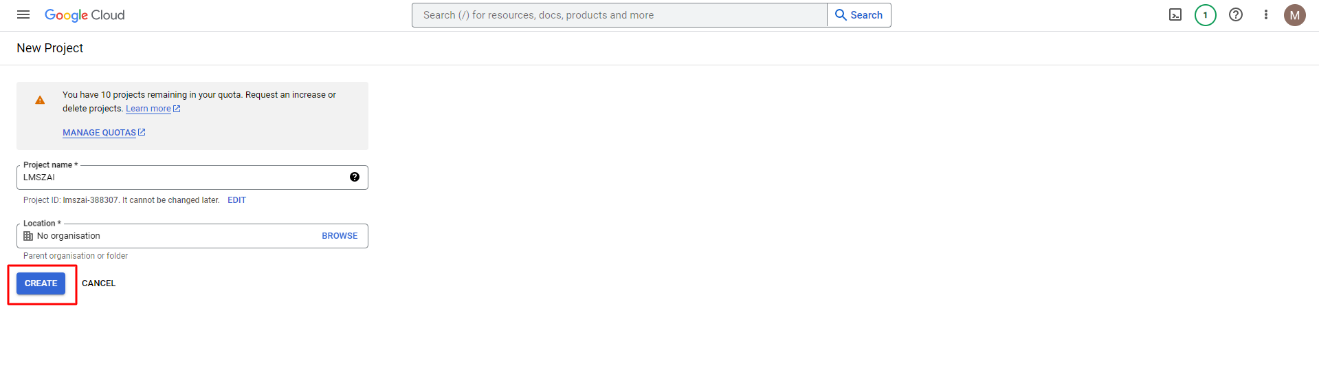
Step 4: Create or Select Project
- Click on the project dropdown (shown as "My Project" or current project name)
- Click New Project to create a new project, or select an existing project
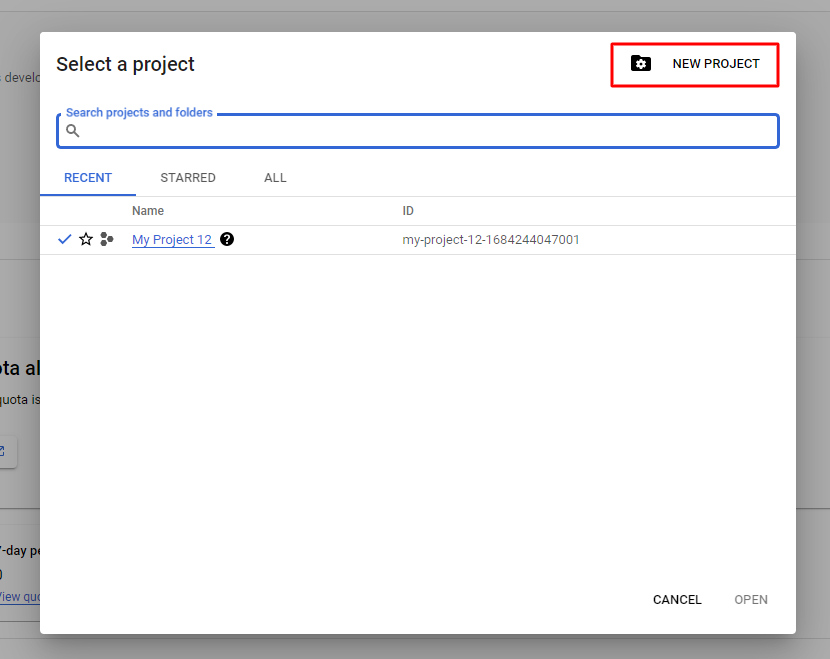
- Enter a project name (e.g., "LMSZAI Social Login")
- Click Create
Step 5: Configure OAuth Consent Screen
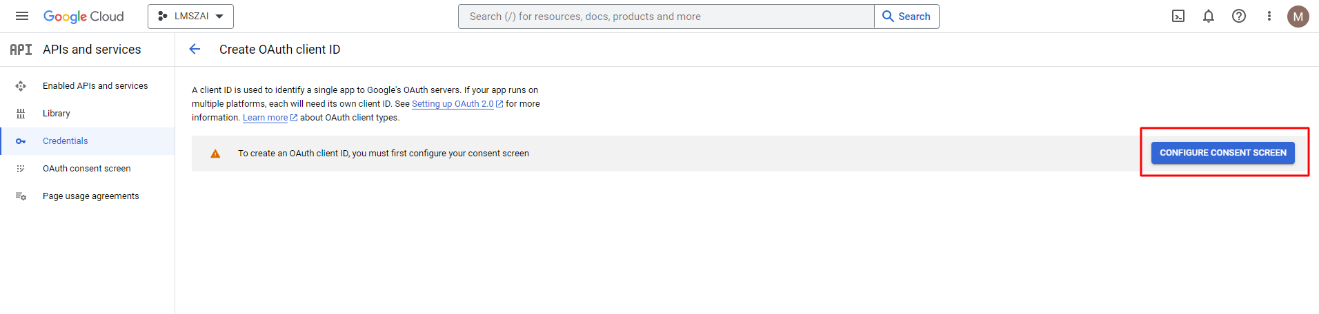
- Navigate to APIs & Services → Credentials
- Click Create Credentials → OAuth client ID
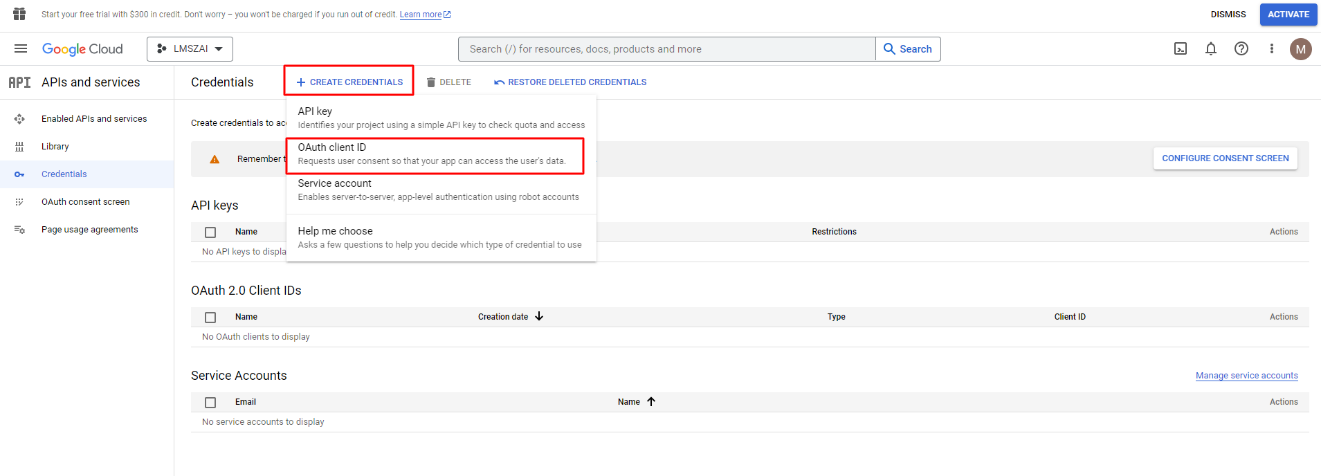
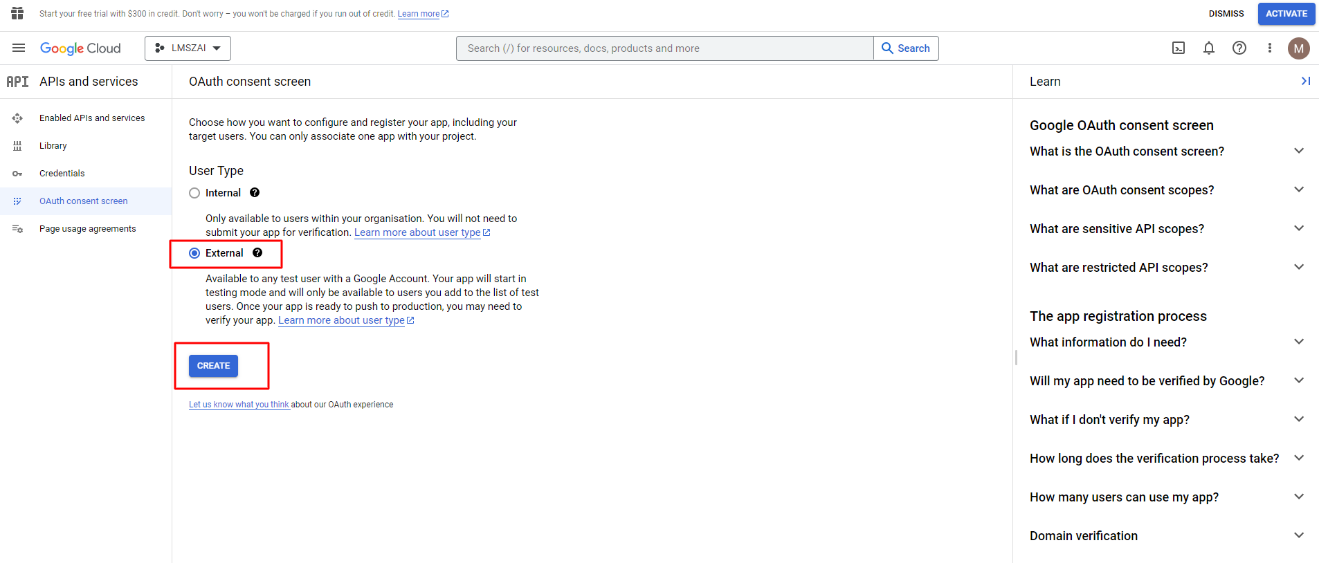
- If prompted, configure the OAuth consent screen by clicking the Configure Consent Screen button
- Select External as the user type and click Create
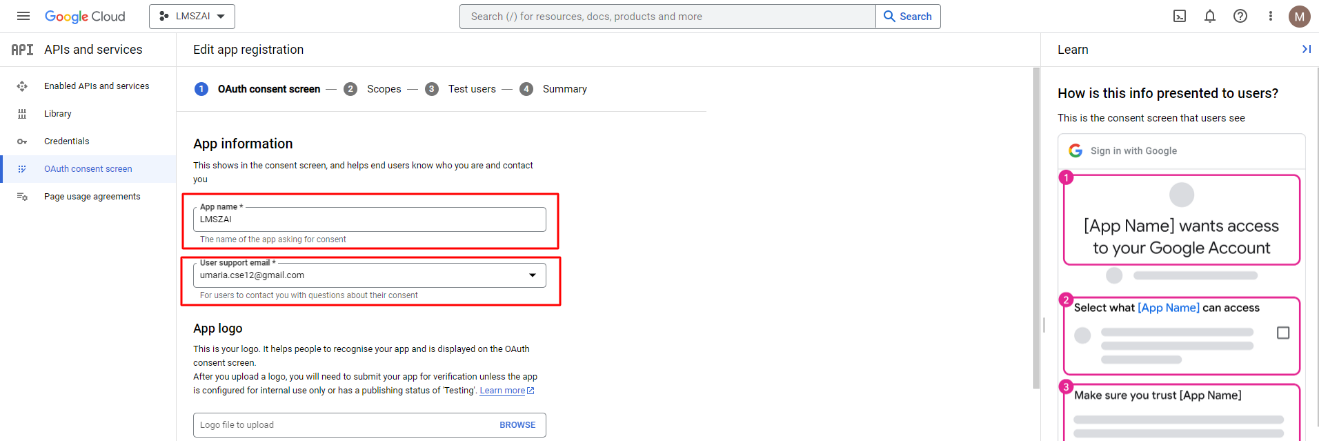
- Fill in the required app information:
- App name
- User support email
- Developer contact information
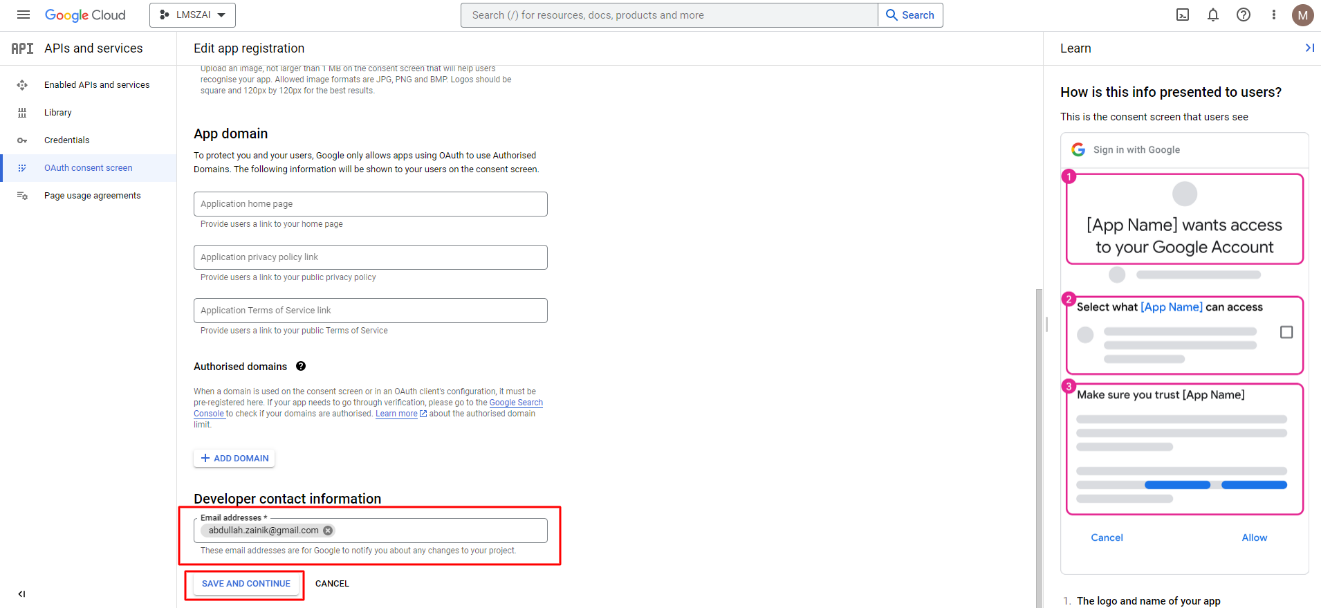
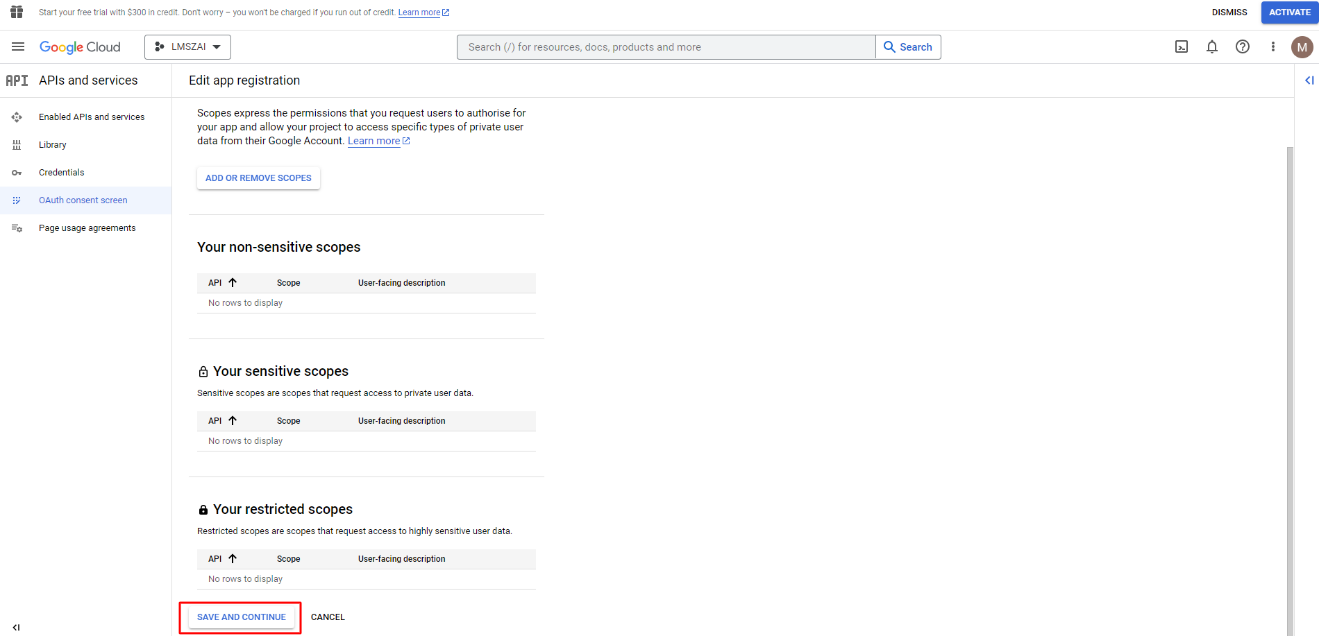
- Click Save and Continue (you can skip the optional scopes in Step 2)
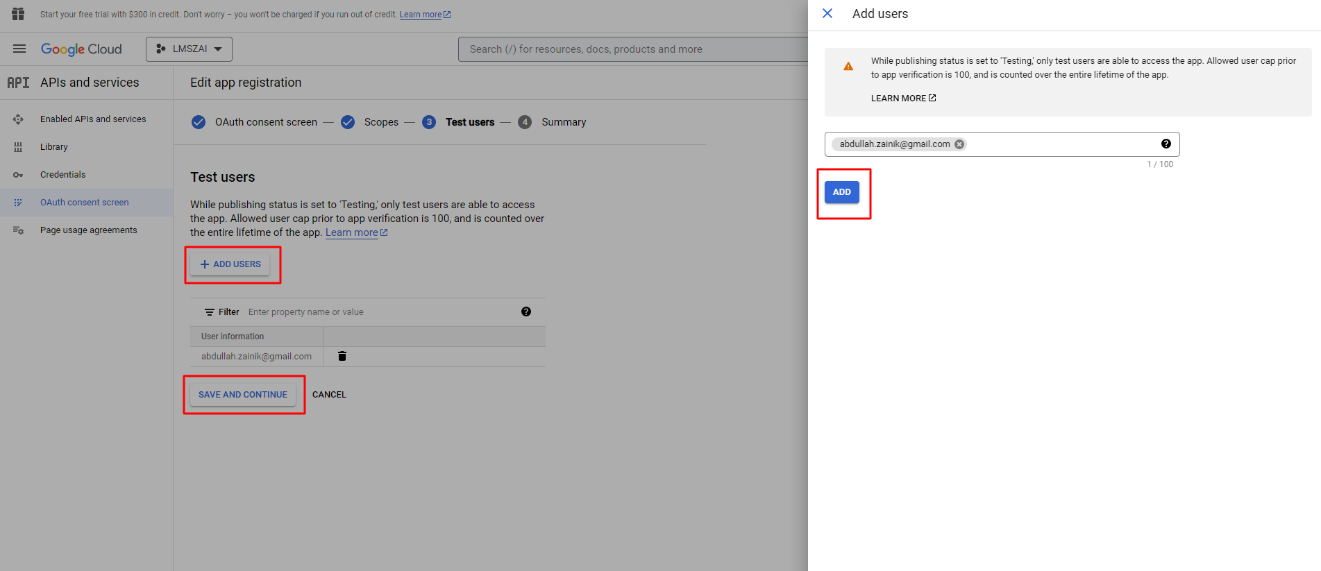
- Add test users if your app is in testing mode, then click Save and Continue
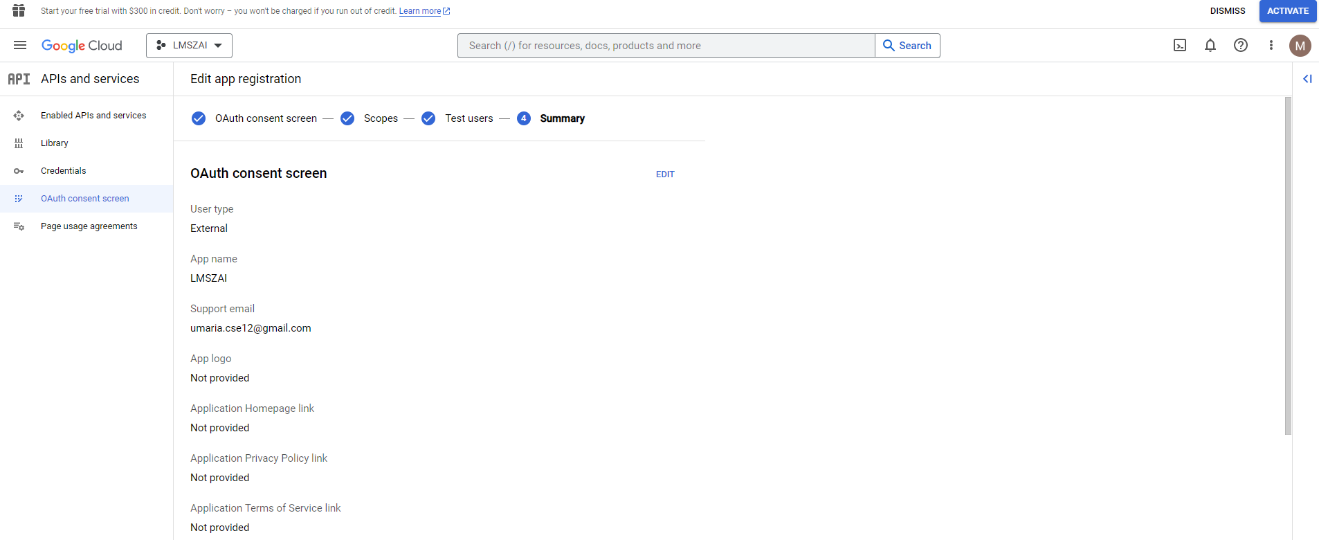
- Review the summary and click Back to Dashboard
Step 6: Create OAuth Client ID
- Return to Credentials → Create Credentials → OAuth client ID
- Select Web application as the application type
- Enter a name for your OAuth client
- Add the authorized redirect URI using this format:
{your-website-url}/login/google/callbackExample:https://lmszai.zainikthemes.com/login/google/callbackImportant: Replace{your-website-url}with your actual domain name
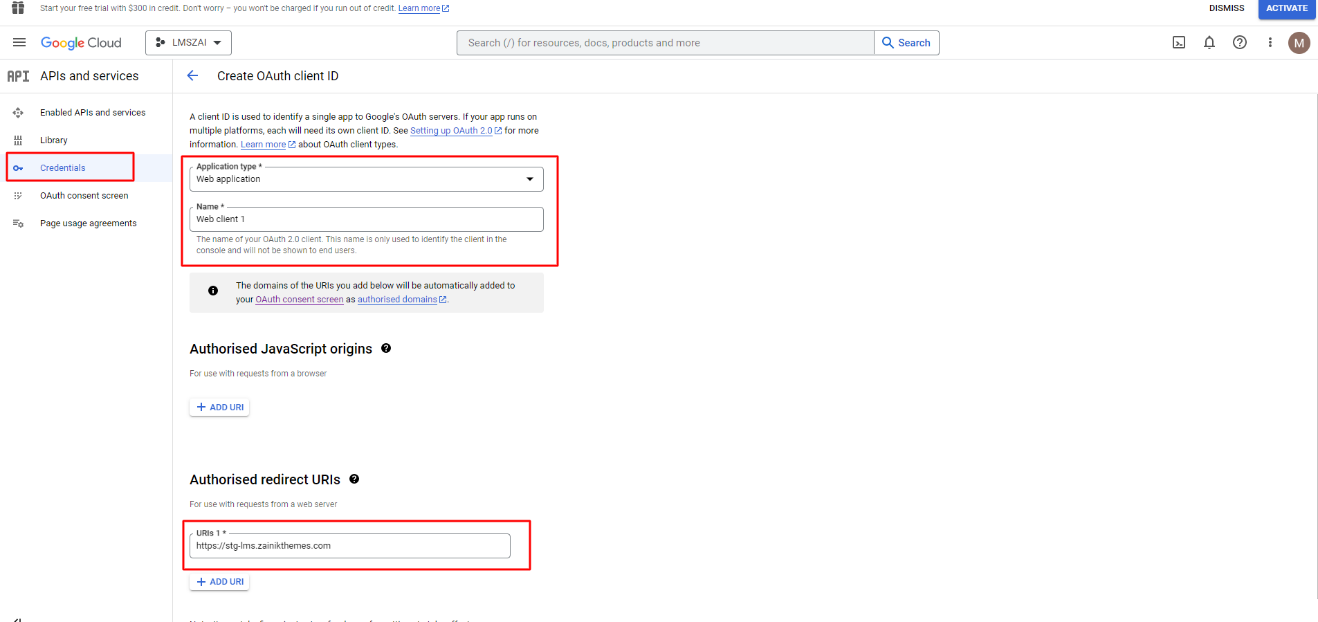
- Click Create
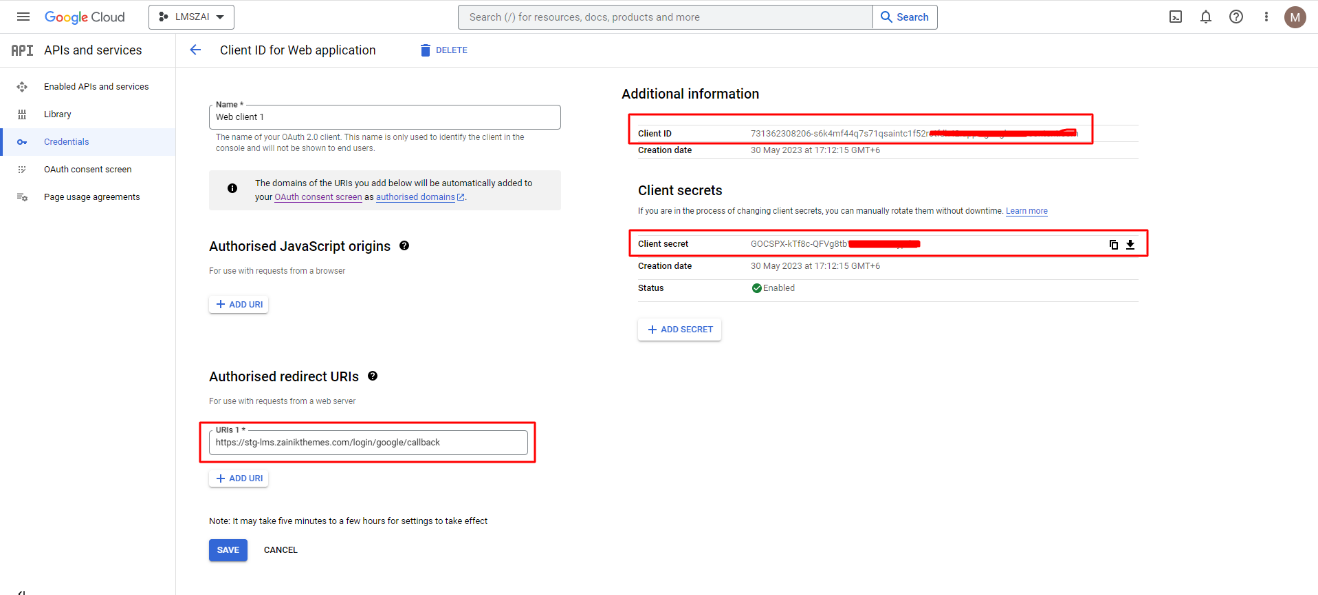
Step 7: Copy Credentials
- Click the Edit button (pencil icon) next to your newly created OAuth client
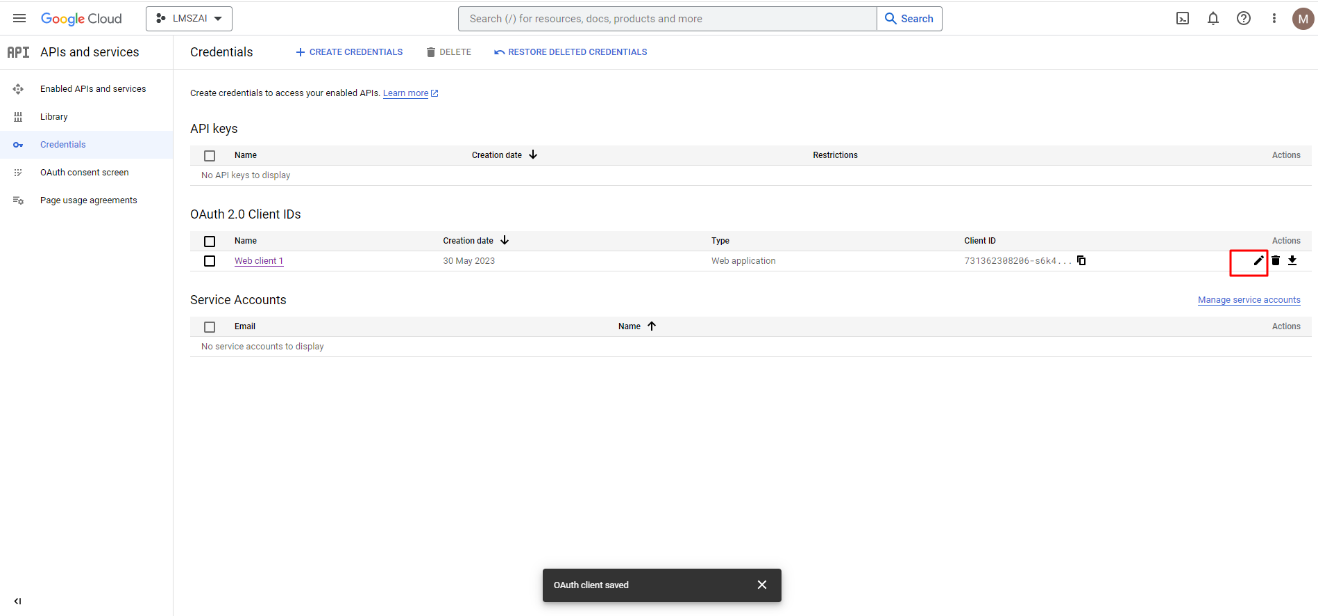
- Copy the following information:
- Client ID
- Client Secret
- Authorized redirect URI
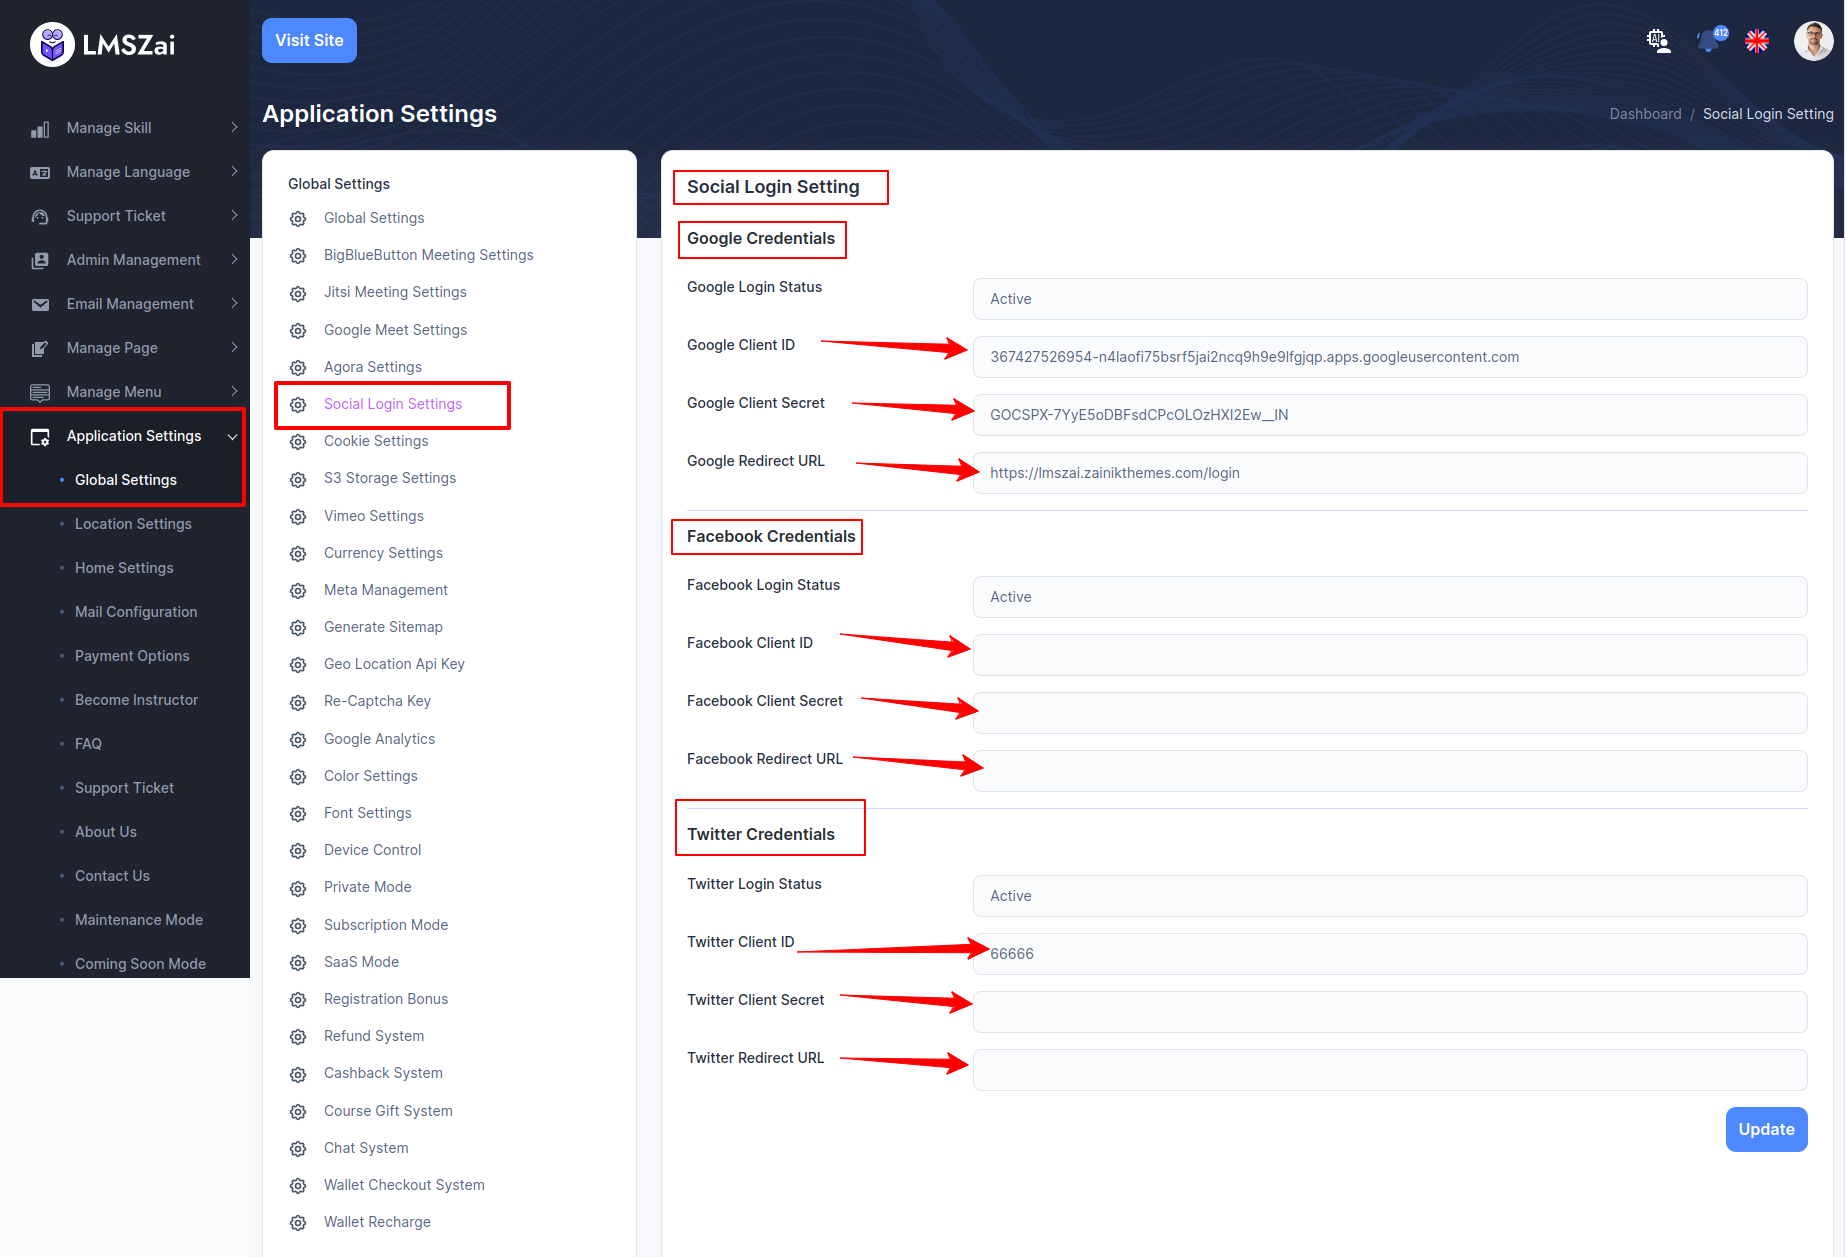
Step 8: Configure in LMSZAI Admin Panel
- Return to your LMSZAI admin panel
- Navigate to Application Settings → Global Settings → Social Login Settings
- Paste the Client ID and Client Secret into the respective fields
- Verify the Redirect URI matches the one you configured in Google Cloud Console
- Enable the Google Login status
- Click Update to save the settings
Testing
- Log out from your admin panel
- Visit the login page
- Click the "Login with Google" button
- Complete the Google authentication process
- Verify that you are redirected back to your LMS platform
Social Login (Facebook)
Overview: Facebook Social Login enables users to register and sign in to your LMS using their Facebook accounts. This integration streamlines the authentication process for users who prefer using social media accounts.
Benefits: - Quick registration process - Access to user profile information (optional) - Reduced form abandonment - Trust factor through Facebook verification
Prerequisites
- A Facebook account
- Access to Facebook Developers Console
- Admin access to your LMSZAI installation
Configuration Steps
Step 1: Access Facebook Developers Console
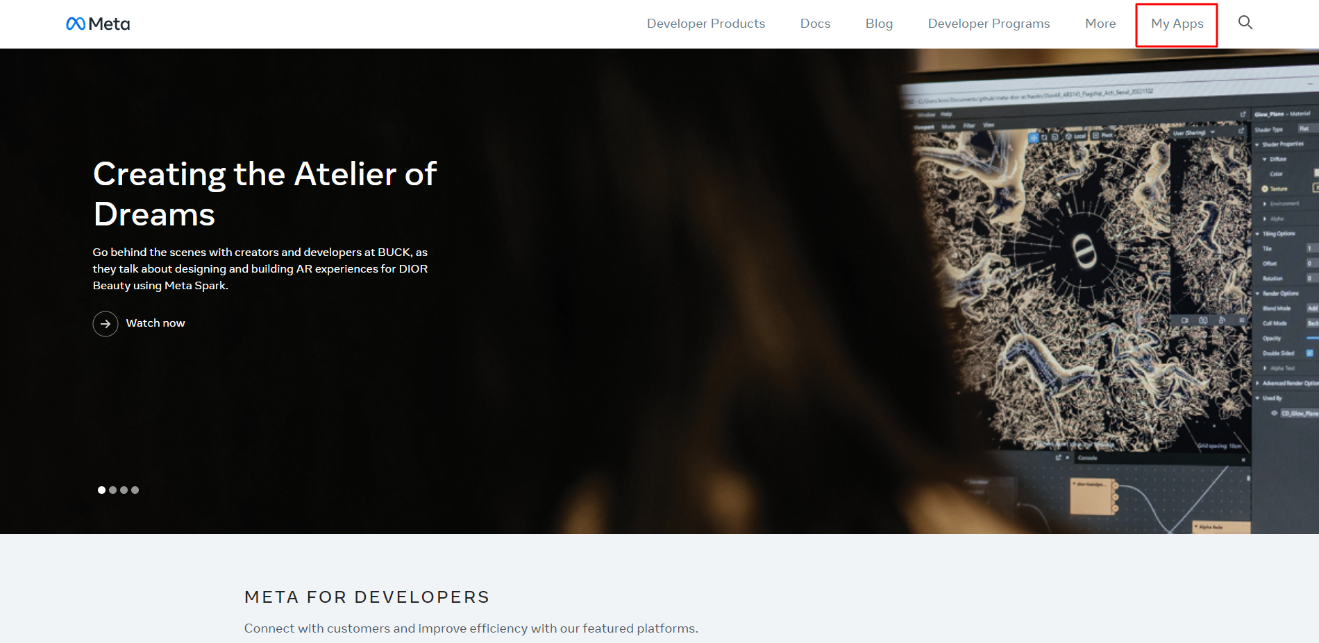
- Visit Facebook Developers
- Sign in with your Facebook account
- Click My Apps in the top-right corner
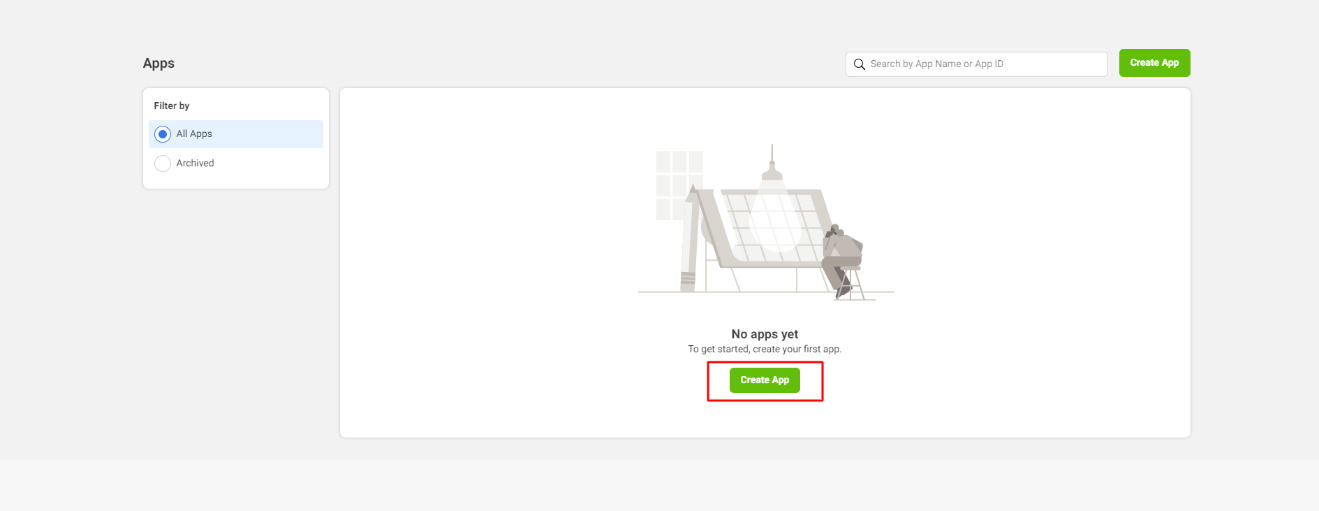
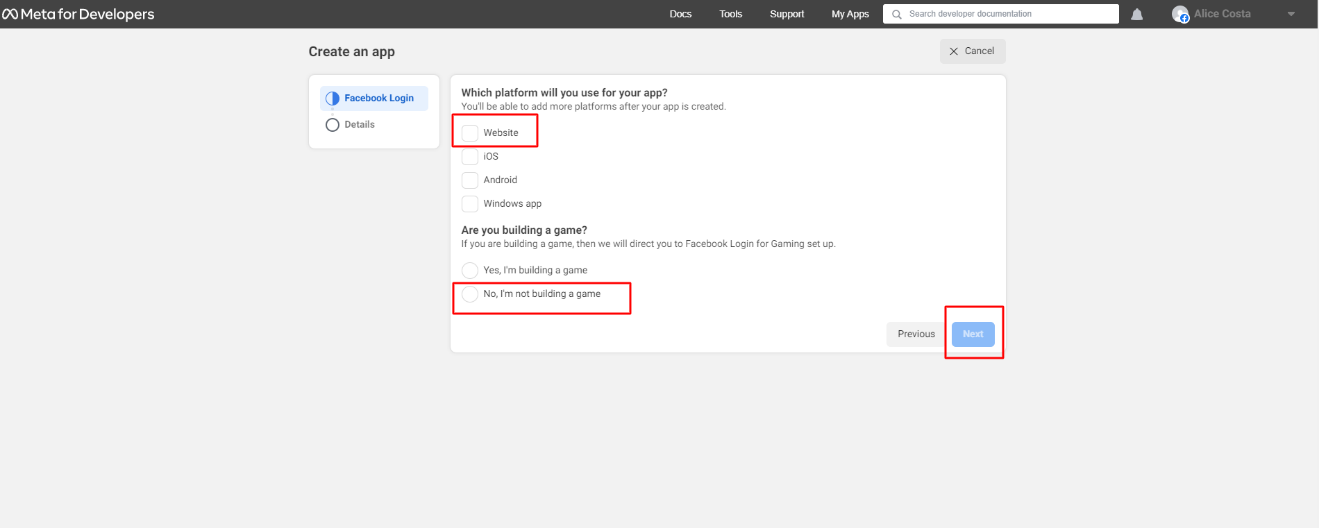
Step 2: Create a New App
- Click the Create App button
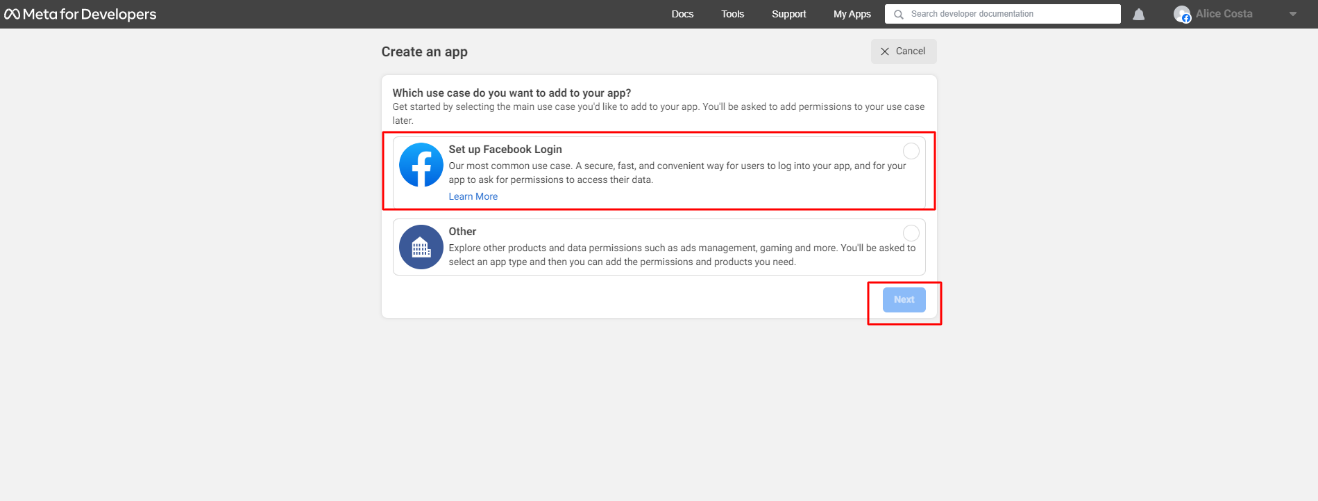
- Select the use case for your app (typically "Consumer" or "Business")
- Click Next
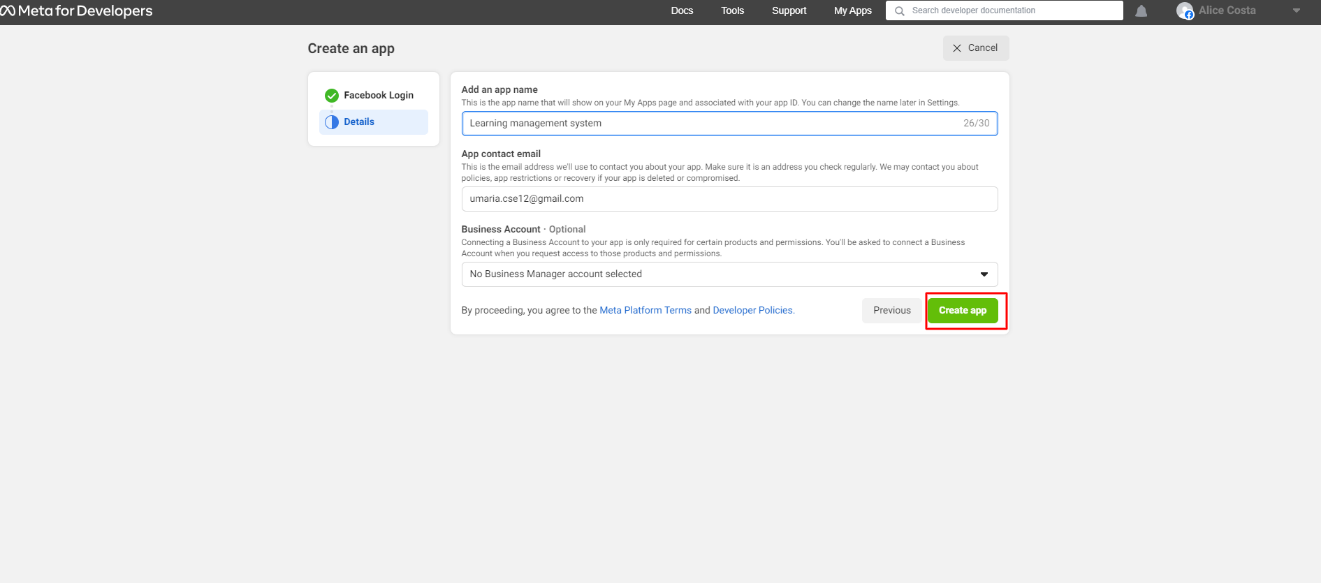
- Fill in the app details:
- App Display Name
- App Contact Email
- Click Create App
Step 3: Add Facebook Login Product
- In the app dashboard, click Add Product
- Find Facebook Login and click Set Up
Step 4: Configure Settings
- Navigate to Settings → Basic in the left sidebar
- Add your App Domain (your website domain without http/https)
- Add Privacy Policy URL and Terms of Service URL (if available)
- Scroll down to Facebook Login settings
- Add the authorized redirect URI using this format:
{your-website-url}/login/facebook/callbackExample:https://lmszai.zainikthemes.com/login/facebook/callback - Click Save Changes
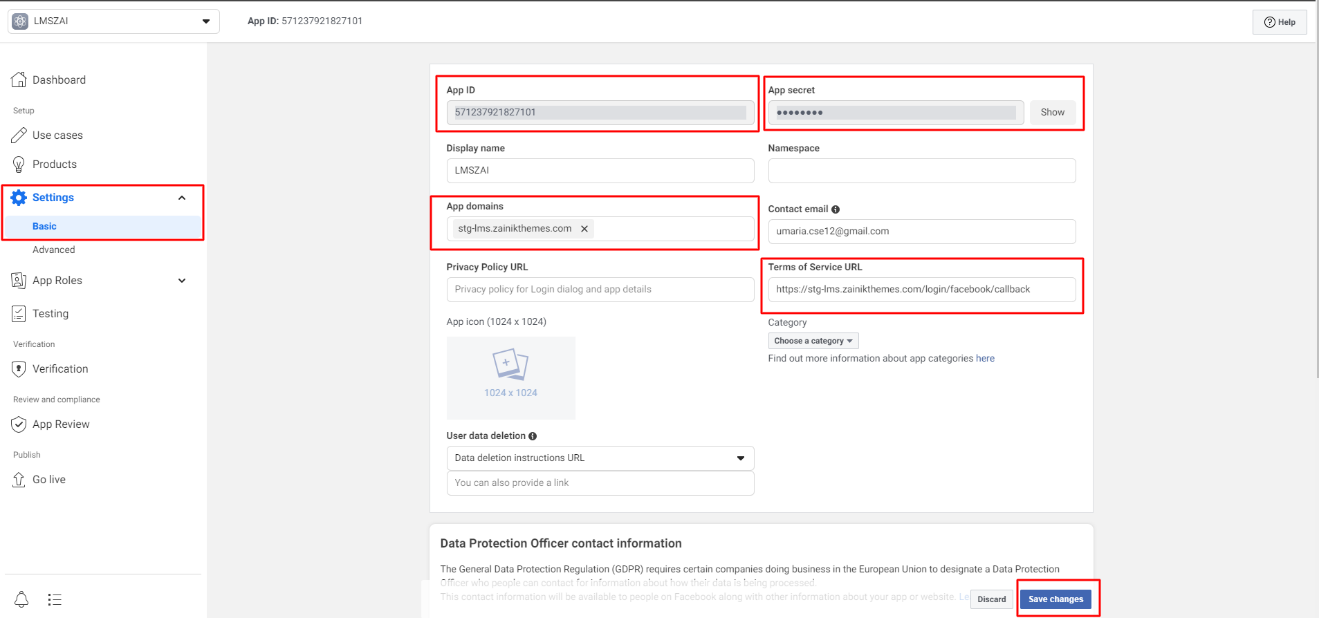
Step 5: Get App Credentials
- In the Basic settings page, you'll find:
- App ID - visible immediately
- App Secret - click Show to reveal it
- Copy both values securely
Step 6: Configure in LMSZAI Admin Panel
- Log in to your LMSZAI admin panel
- Navigate to Application Settings → Global Settings → Social Login Settings
- Paste the App ID and App Secret into the Facebook Login section
- Enable Facebook Login status
- Click Update to save the settings
Testing
- Log out from your admin panel
- Visit the login page
- Click the "Login with Facebook" button
- Complete the Facebook authentication process
- Verify successful login and redirect
Agora Live Class
Overview: Agora Live Class integration allows instructors and organizations to conduct real-time video classes directly within the LMS platform. This feature provides high-quality video streaming, screen sharing, interactive whiteboards, and real-time communication capabilities.
Benefits: - Real-time video conferencing - Interactive learning experience - No need for external meeting links - High-quality audio and video streaming - Screen sharing and collaboration tools
Prerequisites
- An Agora account (free tier available)
- Admin access to your LMSZAI installation
Configuration Steps
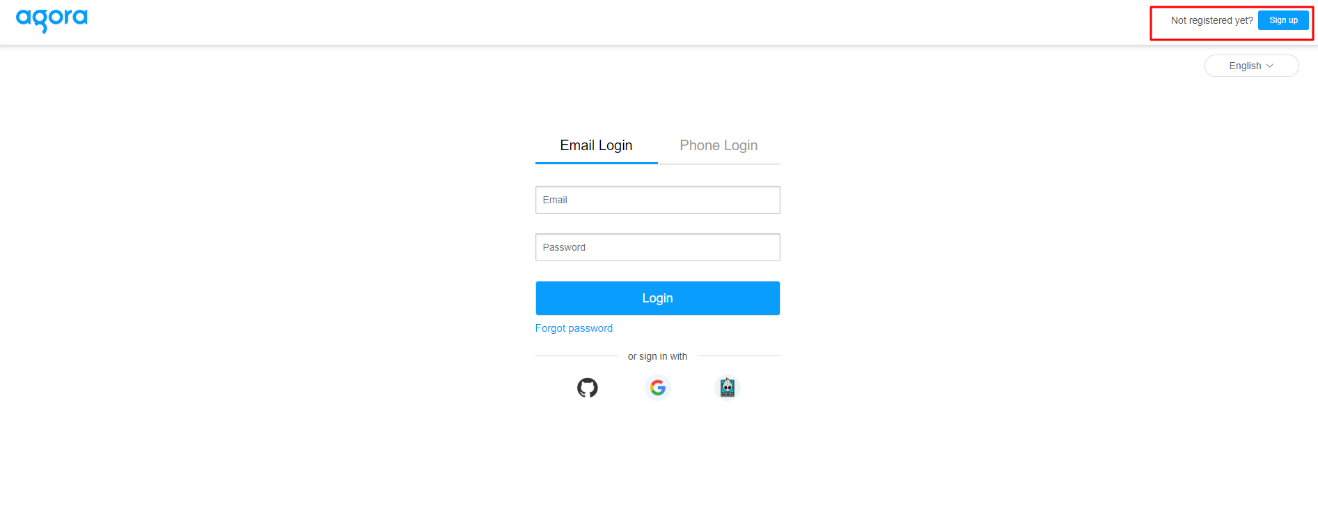
Step 1: Create Agora Account
- Visit Agora Console
- Click Sign Up to create a new account
- Fill in the registration form with valid information:
- Email address
- Password
- Company name (optional)
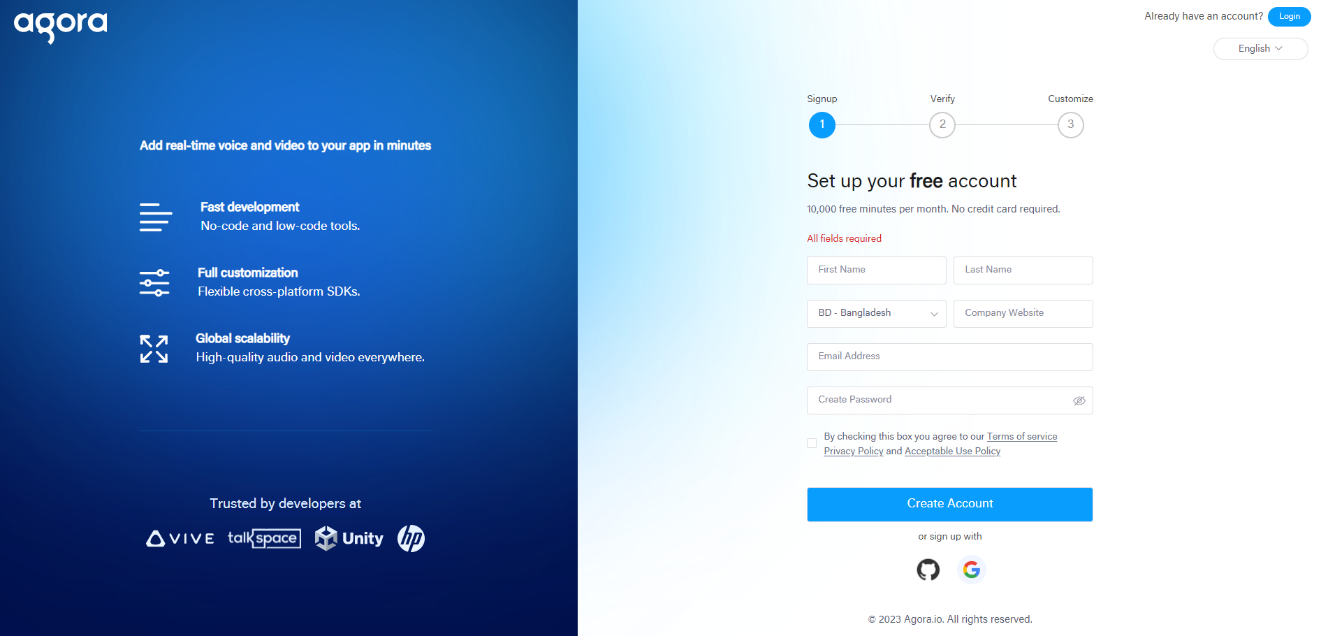
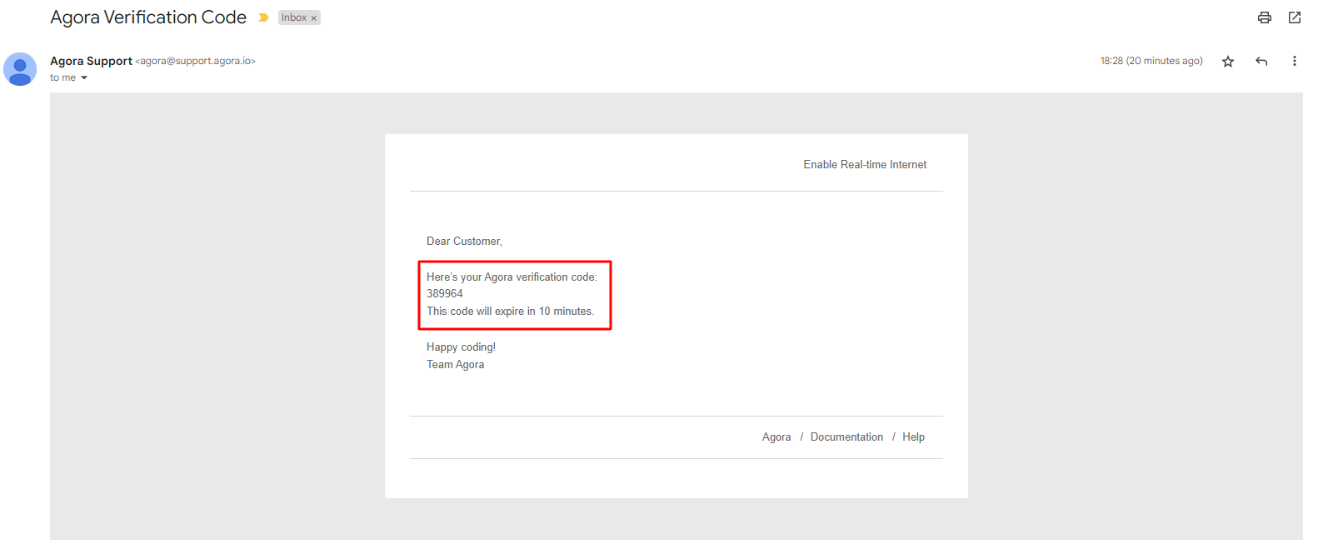
- Check your email for a verification code
- Enter the verification code to complete registration
- Complete any optional surveys or skip them
- You'll be redirected to the Agora Console dashboard
Step 2: Get Agora App ID
- In your Agora Console dashboard, you'll see your App ID displayed
- Copy this App ID - you'll need it for LMSZAI configuration

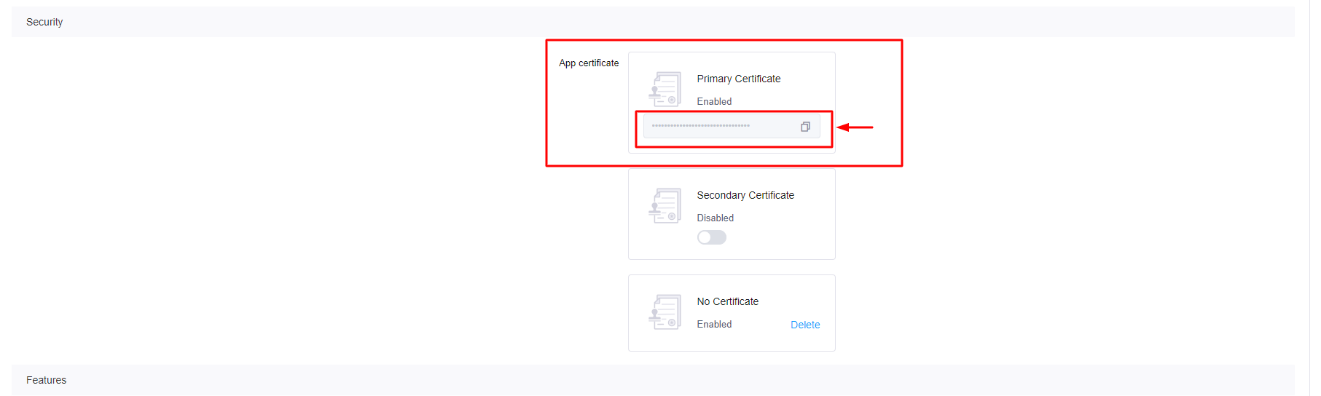
Step 3: Generate App Certificate
- Navigate to Configure in your project settings
- Enable Primary Certificate
- An App Certificate will be generated automatically
- Copy the App Certificate - keep it secure as it won't be shown again
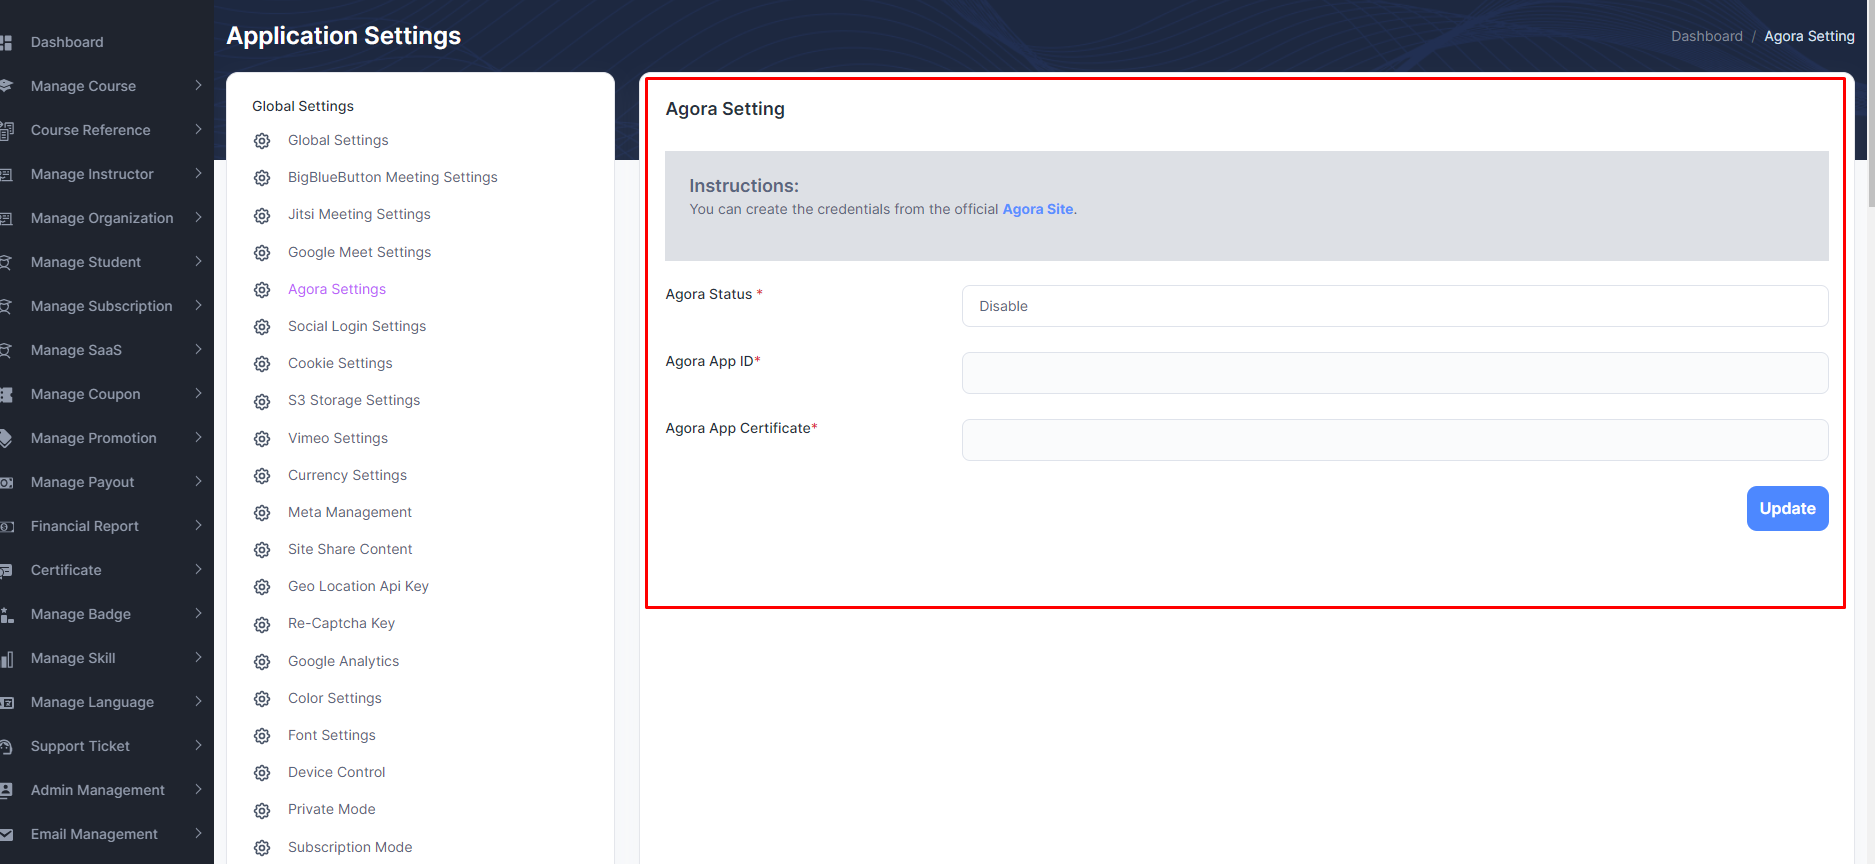
Step 4: Configure in LMSZAI Admin Panel
- Log in to your LMSZAI admin panel
- Navigate to Application Settings → Global Settings → Agora Settings
- Enable Agora Status by toggling it ON
- Paste your Agora App ID in the designated field
- Paste your Agora App Certificate in the designated field
- Click Update to save the settings
Creating a Live Class (Instructor/Organization)
- Log in to the Instructor/Organization panel
- Navigate to Live Class from the sidebar menu
- Click Create Live Class
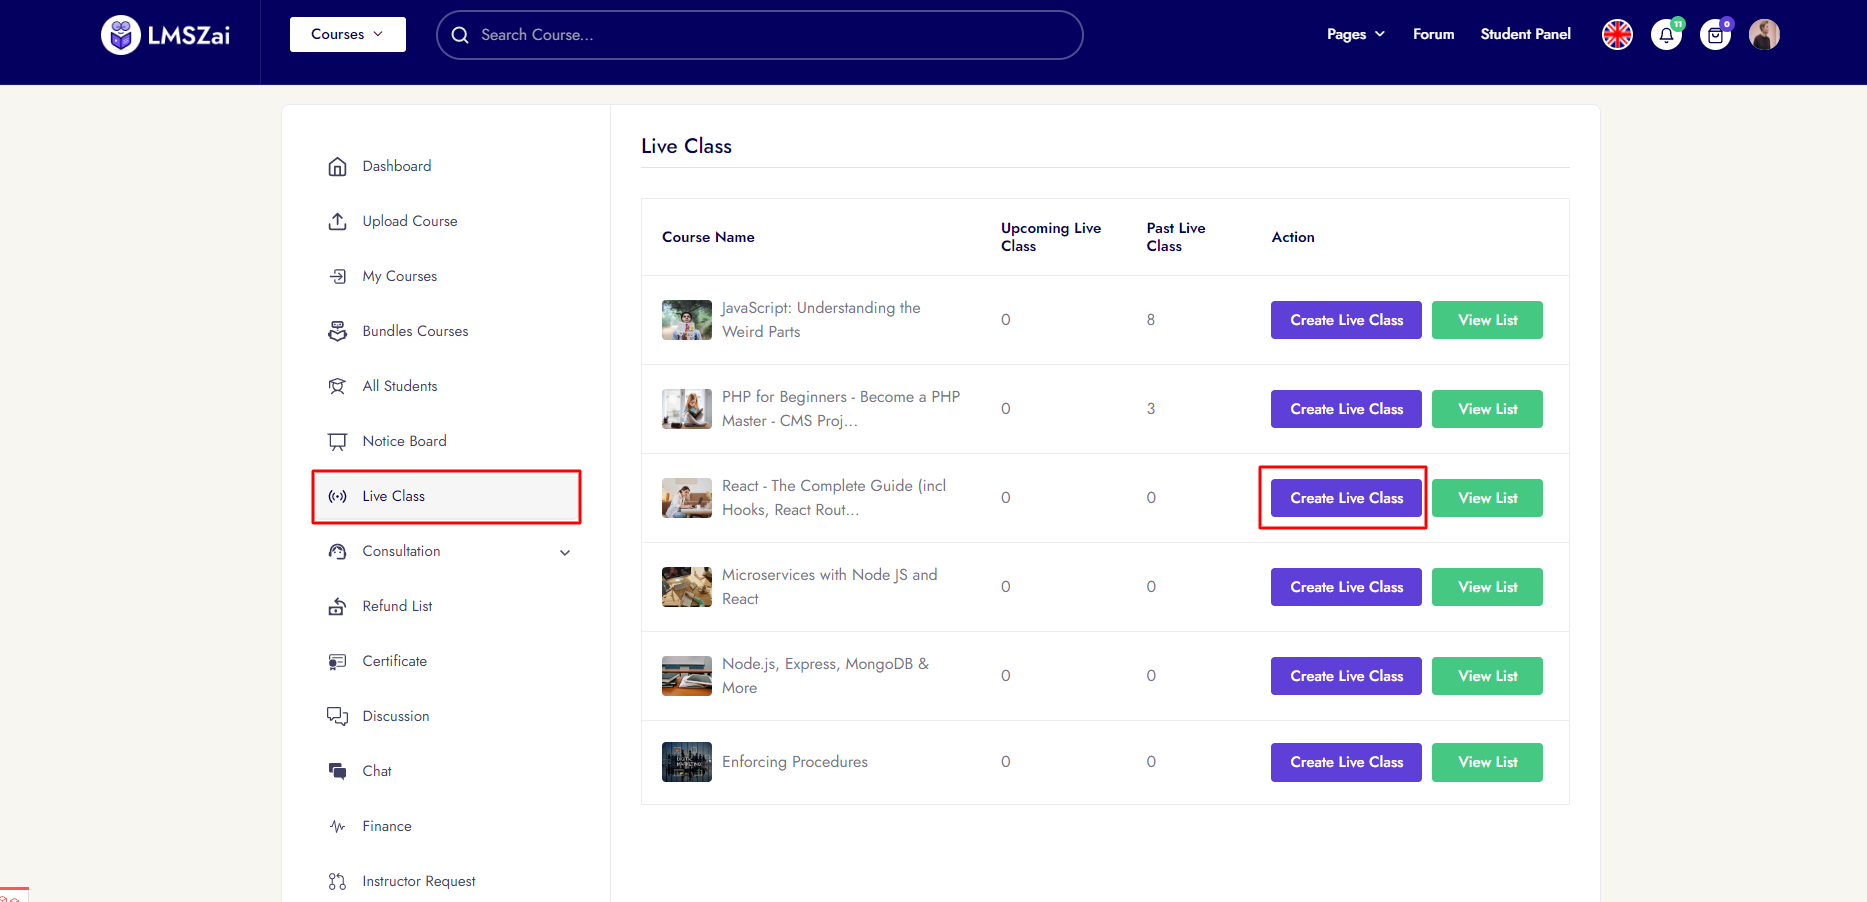
- Fill in the class details:
- Class title
- Description
- Date and time
- Duration
- Select Agora Live App as the meeting host
- Click Create or Save
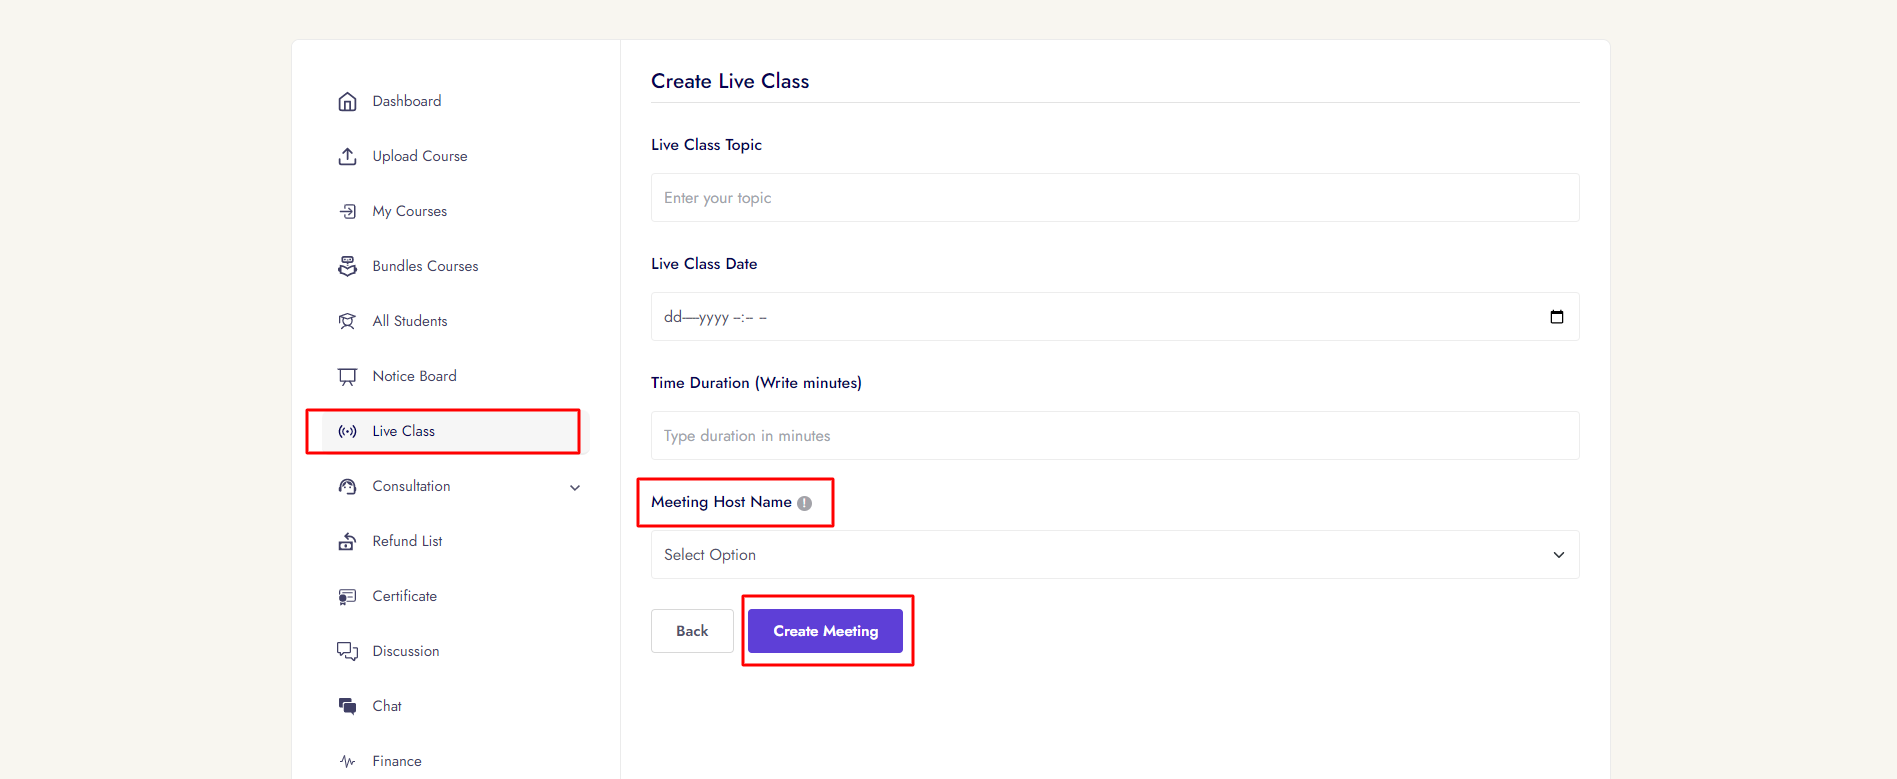
- The live class will appear in your live class list
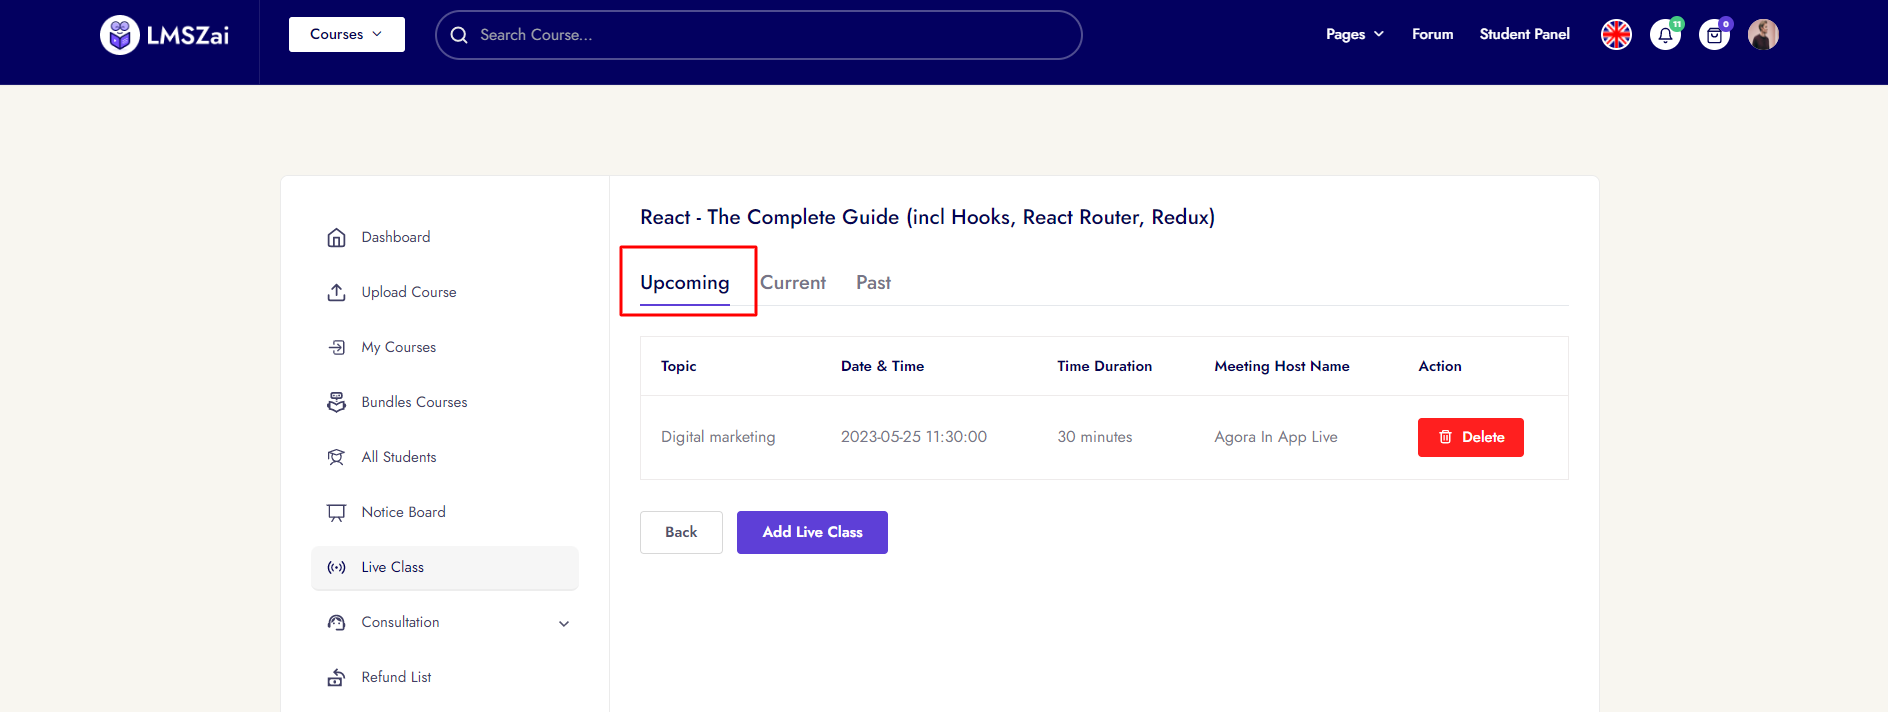
Note: Students who have enrolled in the associated course will be able to join the live class at the scheduled time.
Zoom Live Class
Overview: Zoom Live Class integration enables instructors and organizations to conduct live video classes using Zoom's robust video conferencing platform. This integration allows seamless scheduling and management of Zoom meetings directly from the LMS.
Benefits: - Professional video conferencing platform - Support for large participant numbers - Recording capabilities - Screen sharing and breakout rooms - Familiar interface for most users
Prerequisites
- A Zoom account with API access
- Zoom API Key and API Secret
- Instructor/Organization account access
Important: Each instructor or organization must configure their own Zoom credentials separately.
Configuration Steps
Step 1: Create Zoom API Credentials
- Log in to your Zoom account
- Navigate to Zoom Marketplace
- Click Develop → Build App
- Choose OAuth or Server-to-Server OAuth app type
- Fill in the app details and create the app
- Copy your API Key and API Secret
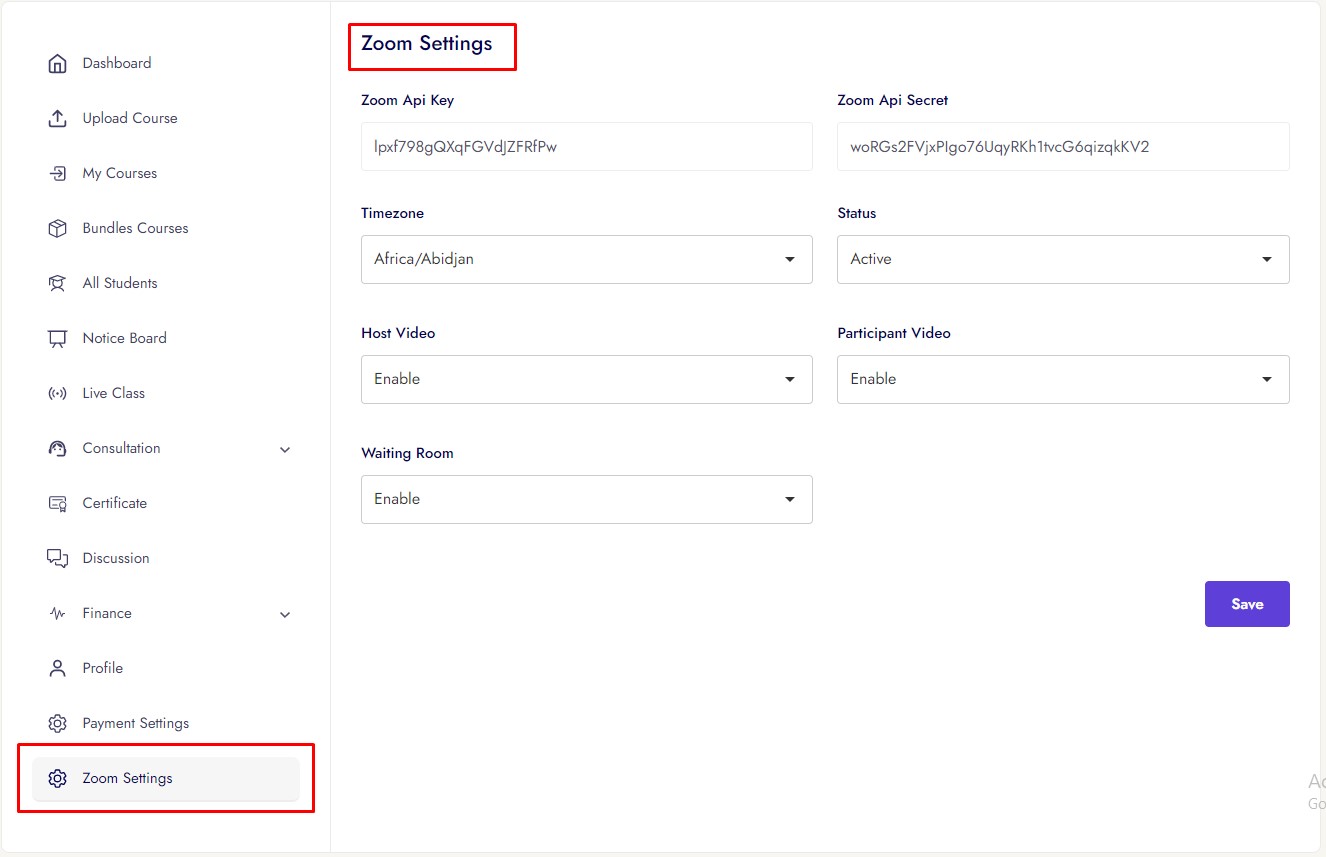
Step 2: Configure in Instructor/Organization Panel
- Log in to your Instructor or Organization panel
- Navigate to Zoom Settings from the sidebar menu
- Enable Zoom Status by toggling it ON
- Enter your Zoom API Key
- Enter your Zoom API Secret
- Click Update to save the settings
Creating a Zoom Live Class
- Navigate to Live Class in your instructor panel
- Click Create Live Class
- Fill in the class details
- Select Zoom as the meeting host type
- Configure meeting settings (if available)
- Save the live class
Note: Ensure your Zoom account has the necessary permissions and plan to support the number of participants you expect.
Google Meet Live Class (Admin Configuration)
Overview: Google Meet Live Class allows instructors and organizations to conduct live video classes using Google Meet. This feature requires initial admin configuration for OAuth credentials, after which instructors can set up their individual Google Calendar credentials.
Benefits: - Integrated with Google Calendar - No additional software installation needed - Automatic meeting creation and calendar invites - High-quality video and audio - Screen sharing capabilities
Prerequisites
- Google Cloud Platform account
- Google Calendar API enabled
- Admin access to configure OAuth credentials
Admin Configuration Steps
Step 1: Enable Google Calendar API
- Visit Google Cloud Console
- Create a new project or select an existing one
- Navigate to APIs & Services → Library
- Search for "Google Calendar API"
- Click Enable
Step 2: Create OAuth 2.0 Credentials
- Navigate to APIs & Services → Credentials
- Click Create Credentials → OAuth client ID
- Configure the OAuth consent screen if prompted
- Select Web application as the application type
- Add authorized redirect URIs (check LMSZAI documentation for exact URI format)
- Copy the Client ID and Client Secret
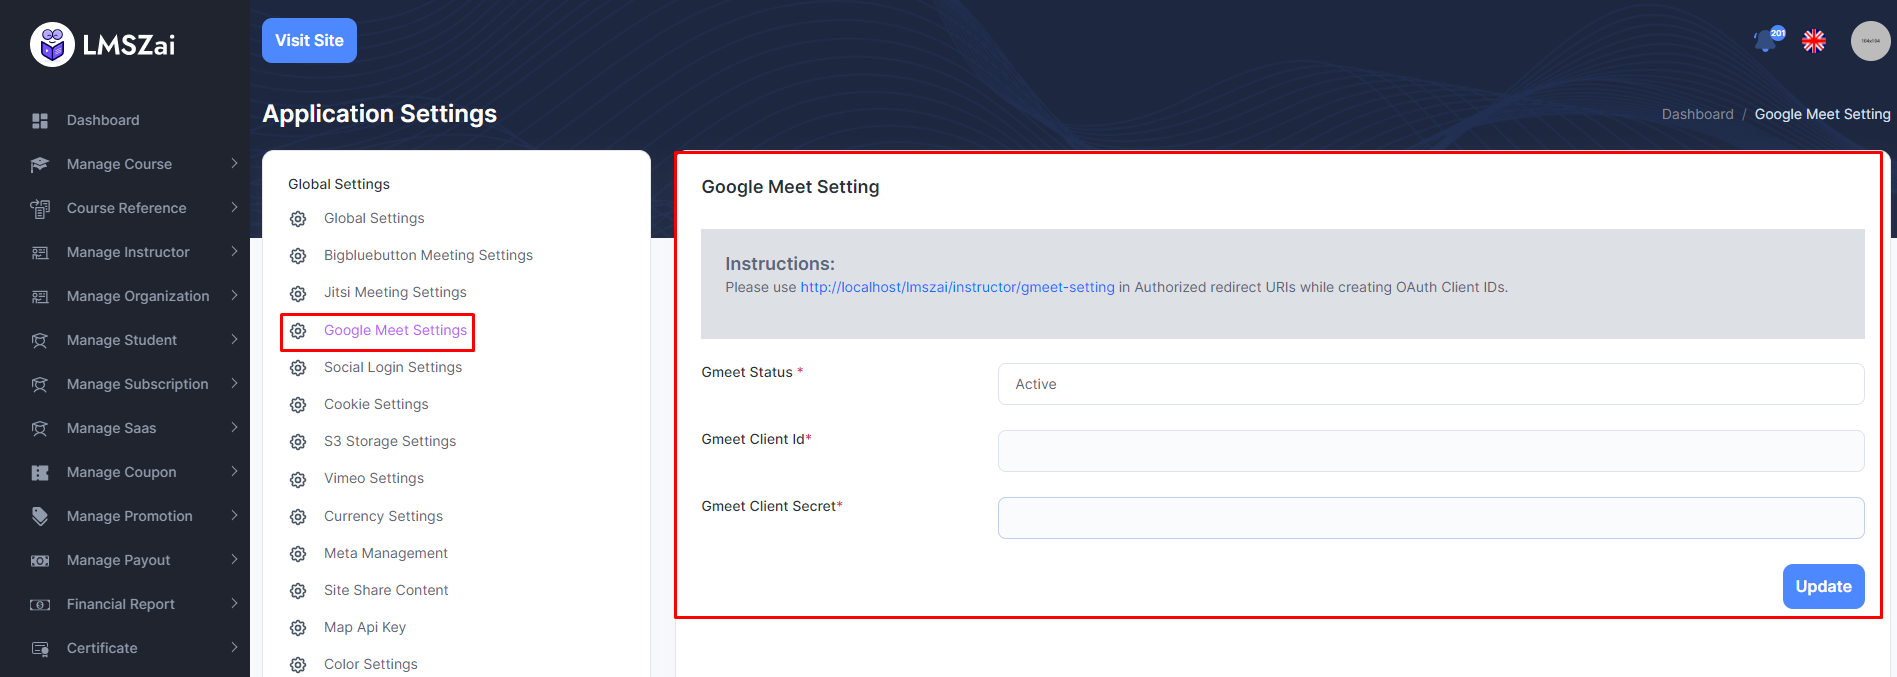
Step 3: Configure in LMSZAI Admin Panel
- Log in to your LMSZAI admin panel
- Navigate to Application Settings → Global Settings → Google Meet Settings
- Enter the Google Calendar OAuth Client ID
- Enter the Google Calendar OAuth Client Secret
- Click Update to save the settings
Google Meet Live Class (Instructor Configuration)
Overview: After admin configuration, each instructor or organization needs to configure their individual Google Calendar credentials to create and manage Google Meet live classes.
Important: Each instructor/organization must configure their own Google Calendar credentials.
Instructor/Organization Configuration Steps
Step 1: Authorize Google Calendar Access
- Log in to your Instructor or Organization panel
- Navigate to Application Settings → Global Settings → Google Meet Settings
- Click Authorize Google Calendar or similar button
- You'll be redirected to Google's authorization page
- Sign in with the Google account you want to use for Meet classes
- Grant the necessary permissions
Step 2: Configure Settings
- Enter your Calendar ID or Gmail ID (the email associated with your Google Calendar)
- Select your Timezone
- Click Update to save the settings
Creating a Google Meet Live Class
- Navigate to Live Class in your instructor panel
- Click Create Live Class
- Fill in the class details
- Select Google Meet as the meeting host type
- The system will automatically create a Google Meet link and calendar event
- Save the live class
BigBlueButton Live Class
Overview: BigBlueButton (BBB) is an open-source web conferencing system designed for online learning. It provides real-time sharing of audio, video, slides, chat, and screen, making it ideal for virtual classrooms.
Benefits: - Open-source and self-hosted option - Designed specifically for education - Interactive whiteboard - Polling and breakout rooms - Recording capabilities
Prerequisites
- A BigBlueButton server (self-hosted or cloud instance)
- BBB Server Base URL
- BBB Security Salt (API secret key)
- Admin access to your LMSZAI installation
Configuration Steps
Step 1: Obtain BigBlueButton Credentials
- Install BigBlueButton server following the official documentation
- Access your BBB server admin panel
- Retrieve your Security Salt (BBB_SECRET) from the server configuration
- Note your BBB Server Base URL (e.g.,
https://bbb.yourserver.com/bigbluebutton/)
For detailed information about BBB API and security model, refer to the official BBB API documentation.
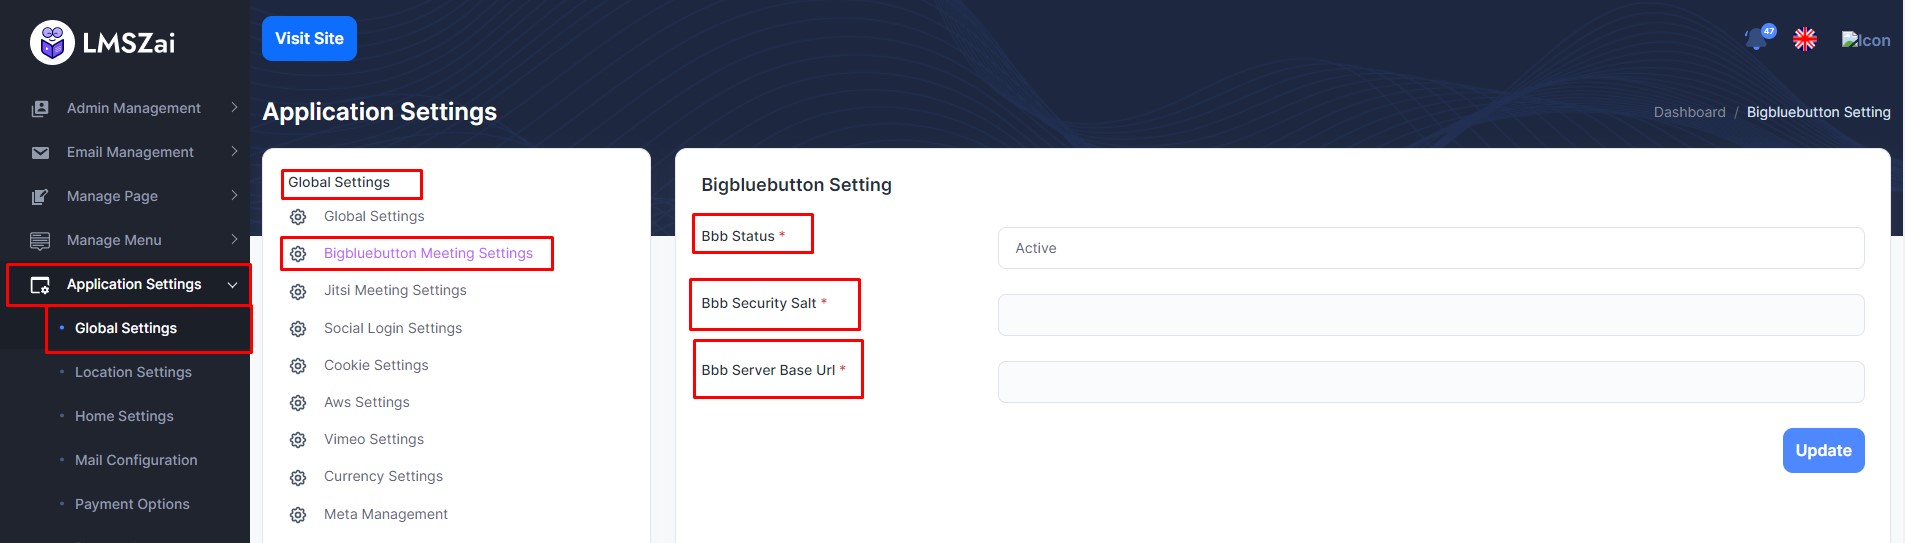
Step 2: Configure in LMSZAI Admin Panel
- Log in to your LMSZAI admin panel
- Navigate to Application Settings → Global Settings → BigBlueButton Meeting Settings
- Enable BBB Status by toggling it ON
- Enter your BBB Security Salt in the designated field
- Enter your BBB Server Base URL (ensure it includes the
/bigbluebutton/path) - Click Update to save the settings

Creating a BigBlueButton Live Class
- Instructors can navigate to Live Class in their panel
- Click Create Live Class
- Fill in the class details
- Select BigBlueButton as the meeting host type
- Save the live class
Note: Ensure your BBB server has sufficient resources to handle the expected number of concurrent users.
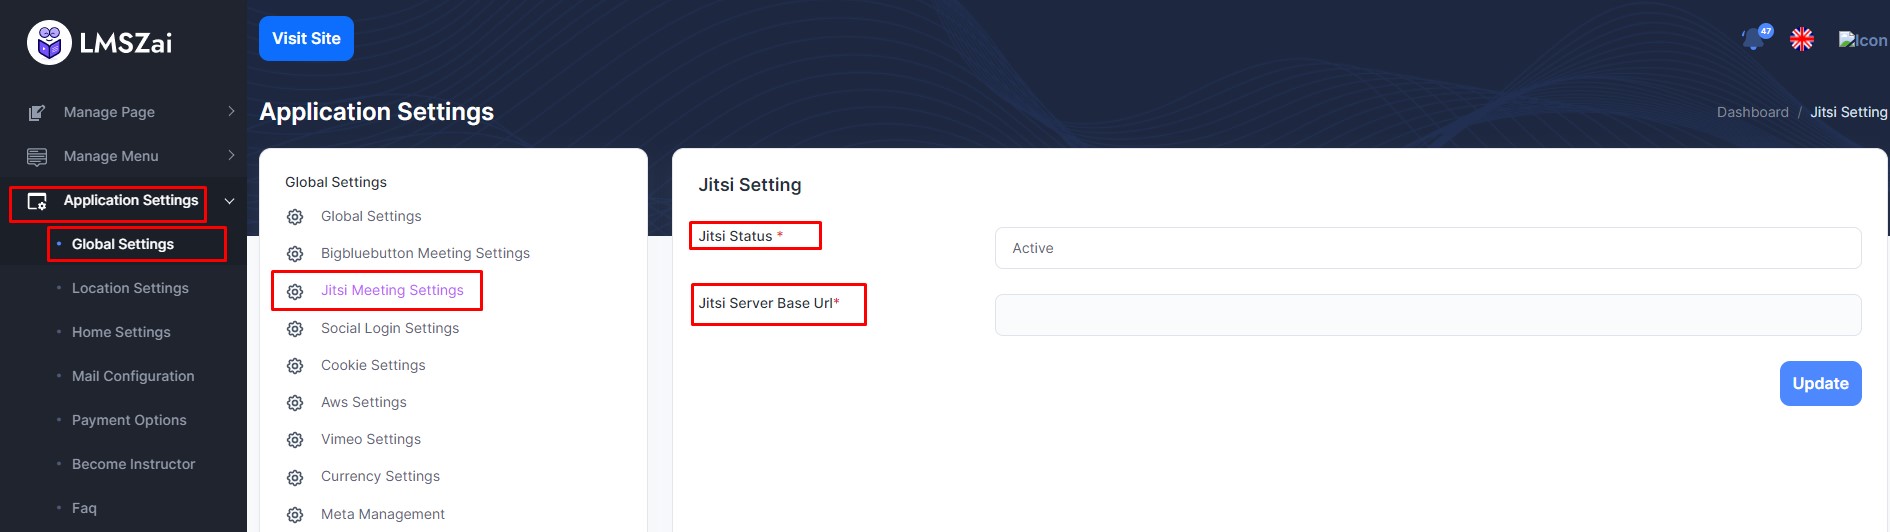
Jitsi Live Class
Overview: Jitsi is an open-source video conferencing solution that can be self-hosted or used via Jitsi Meet. It provides encrypted video, audio, and screen sharing capabilities without requiring user accounts.
Benefits: - Open-source and privacy-focused - No account required for participants - End-to-end encryption - Can be self-hosted - Easy to use
Prerequisites
- A Jitsi server instance (self-hosted or Jitsi Meet cloud)
- Jitsi Server Base URL
- Admin access to your LMSZAI installation
Configuration Steps
Step 1: Set Up Jitsi Server
You have two options: - Option 1: Use Jitsi Meet cloud service (free, no setup required) - Option 2: Self-host Jitsi following the official installation guide
For cloud service, use: https://meet.jit.si
For self-hosted, use your server URL: https://your-jitsi-server.com
Step 2: Configure in LMSZAI Admin Panel
- Log in to your LMSZAI admin panel
- Navigate to Application Settings → Global Settings → Jitsi Meeting Settings
- Enable Jitsi Status by toggling it ON
- Enter your Jitsi Server Base URL (e.g.,
https://meet.jit.sior your custom server URL) - Click Update to save the settings
Creating a Jitsi Live Class
- Instructors can navigate to Live Class in their panel
- Click Create Live Class
- Fill in the class details
- Select Jitsi as the meeting host type
- Save the live class
Note: When using Jitsi Meet cloud, meetings are public by default. Consider self-hosting for enhanced privacy and security.
S3 Storage Settings (AWS, Wasabi, Vultr)
Overview: S3-compatible storage allows you to store video files and other course materials on cloud storage services instead of your local server. This reduces server load, improves scalability, and provides better performance for content delivery.
Supported Services: - AWS S3 - Amazon Web Services Simple Storage Service - Wasabi S3 - High-performance, cost-effective S3-compatible storage - Vultr S3 - Vultr's object storage service
Benefits: - Reduced server storage costs - Improved video delivery performance - Better scalability - Automatic backups - CDN integration capabilities
Prerequisites
- An account with AWS, Wasabi, or Vultr
- Access keys (Access Key ID and Secret Access Key)
- A storage bucket created in your cloud provider
- Admin access to your LMSZAI installation
Configuration Steps
Step 1: Create Storage Bucket
- Log in to your cloud storage provider's console:
- AWS: AWS Console
- Wasabi: Wasabi Console
-
Vultr: Vultr Console
-
Create a new S3 bucket:
- Choose a unique bucket name
- Select an appropriate region (closer to your users is better)
- Configure bucket permissions (public read access may be needed for videos)
Step 2: Create Access Keys
- Navigate to your account's security/credentials section
- Create a new access key pair:
- Access Key ID - acts as your username
- Secret Access Key - acts as your password (save this securely)
Security Note: Store your access keys securely and never share them publicly.
Step 3: Configure in LMSZAI Admin Panel
- Log in to your LMSZAI admin panel
- Navigate to Application Settings → Global Settings → S3 Storage Settings
- Select your storage provider (AWS S3, Wasabi S3, or Vultr S3)
- Enable the storage service by toggling the status ON
- Enter the following credentials:
- Access Key ID
- Secret Access Key
- Bucket Name
- Region (e.g.,
us-east-1,eu-west-1) - Endpoint URL (if required by your provider)
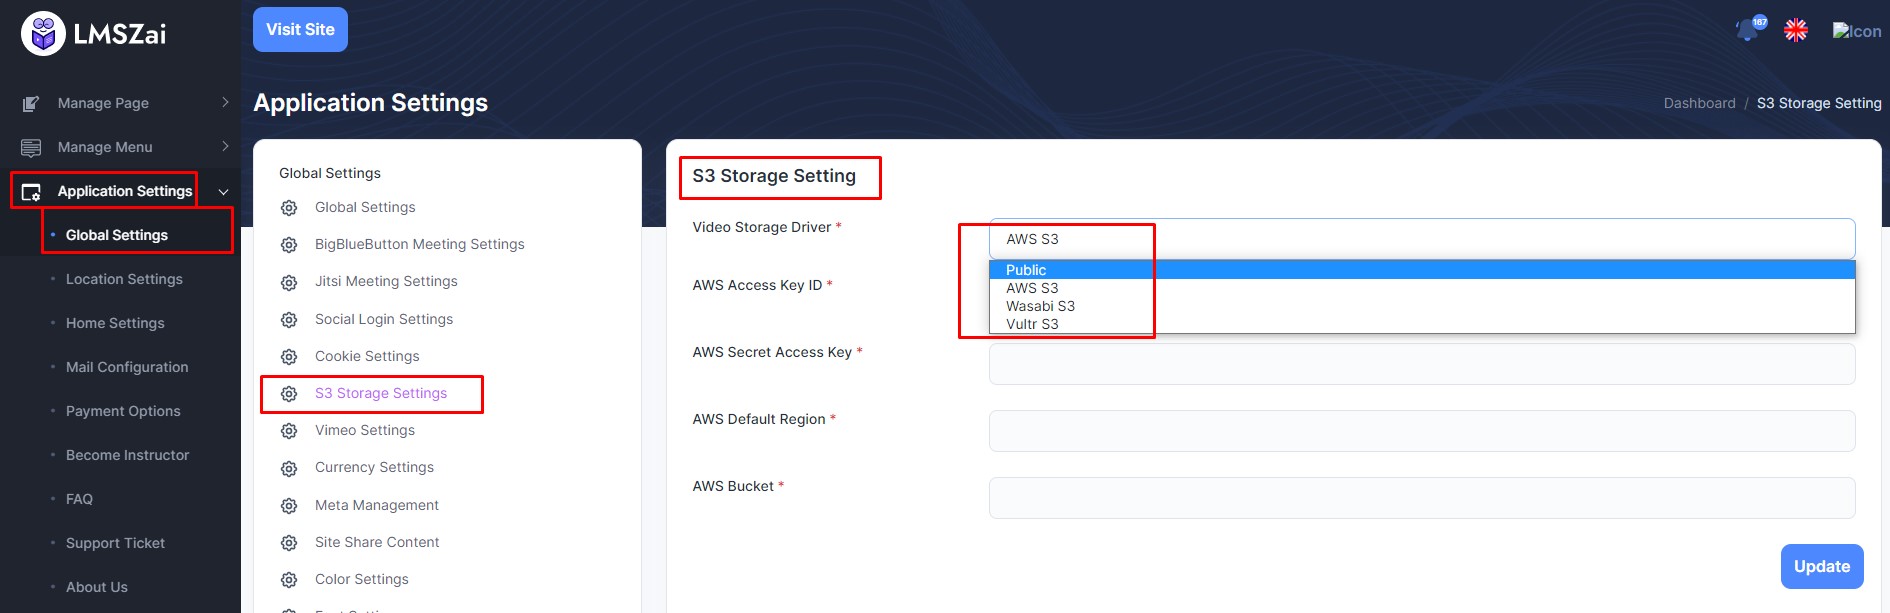
- Set Video Storage Driver to your S3 provider (not "public")
- Click Update to save the settings
Important Notes
- If you deactivate S3 storage, ensure you change Video Storage Driver back to public
- Existing videos stored locally won't automatically migrate to S3
- New video uploads will be stored in your configured S3 bucket
- Test upload a small video file to verify the configuration works correctly
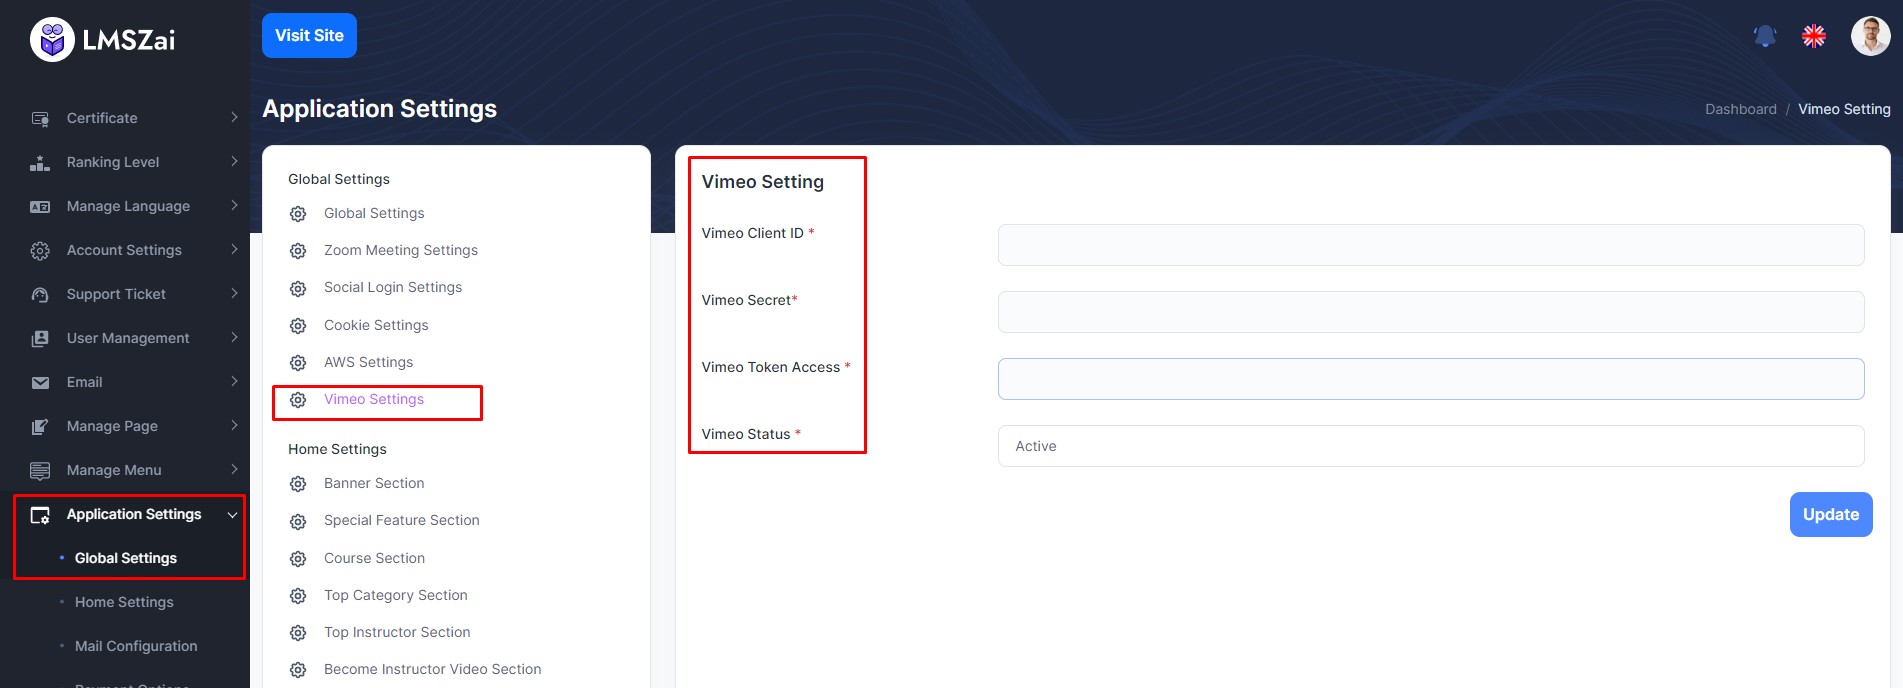
Vimeo Integration
Overview: Vimeo integration allows you to host course videos on Vimeo's platform instead of your server. This offloads video hosting and streaming to Vimeo's infrastructure, providing better performance and reducing server bandwidth usage.
Benefits: - Professional video hosting and streaming - Reduced server bandwidth costs - Better video playback performance - Advanced privacy controls - No video storage limitations on your server
Prerequisites
- A Vimeo account (Pro or higher recommended for better features)
- Vimeo API credentials (Client ID, Client Secret, Access Token)
- Admin access to your LMSZAI installation
Configuration Steps
Step 1: Create Vimeo API Application
- Visit Vimeo Developer Portal
- Log in with your Vimeo account
- Click Create an app or New app
- Fill in the application details:
- App name
- App description
- App URL (your website URL)
- Redirect URL (if needed)
- Submit the application
Step 2: Get API Credentials
- After creating the app, you'll be redirected to the app settings
- Copy the following credentials:
- Client ID
- Client Secret
- Generate an Access Token:
- Click Generate token or Authenticate
- Select the scopes/permissions needed (typically:
upload,edit,delete,private) - Copy the generated access token
Step 3: Configure in LMSZAI Admin Panel
- Log in to your LMSZAI admin panel
- Navigate to Application Settings → Global Settings → Vimeo Settings
- Enable Vimeo Status by toggling it ON
- Enter the following credentials:
- Vimeo Client ID
- Vimeo Client Secret
- Vimeo Access Token
- Click Update to save the settings
Important Notes
- Videos uploaded to Vimeo will be stored on Vimeo's servers
- Vimeo account limits (storage, bandwidth) apply based on your Vimeo plan
- If you deactivate Vimeo, set Vimeo Status to Deactivated
- Ensure your Vimeo access token has the necessary permissions for video upload and management
Payment Gateway Configuration
Overview: Payment gateway integration enables your LMS to accept payments for courses and other purchases. LMSZAI supports multiple payment gateways, allowing you to offer various payment options to your students based on their location and preferences.
Supported Payment Gateways: - PayPal - Global payment processing - Stripe - Credit/debit card processing - Razorpay - Popular in India - SSLCOMMERZ - Popular in Bangladesh - Mollie - Popular in Europe - Instamojo - Popular in India - Paystack - Popular in Africa
Benefits: - Multiple payment options for users - Secure payment processing - Automatic transaction handling - Support for various currencies and regions
Prerequisites
- Business account with your chosen payment gateway(s)
- API credentials from your payment gateway provider
- Admin access to your LMSZAI installation
Configuration Steps
Step 1: Obtain Payment Gateway Credentials
- Log in to your payment gateway account
- Navigate to the API/Developer section
- Create API keys or credentials:
- Test/Sandbox credentials (for testing)
- Live/Production credentials (for real transactions)
Important: Use test credentials initially to verify the integration works correctly before switching to live mode.
Step 2: Configure in LMSZAI Admin Panel
- Log in to your LMSZAI admin panel
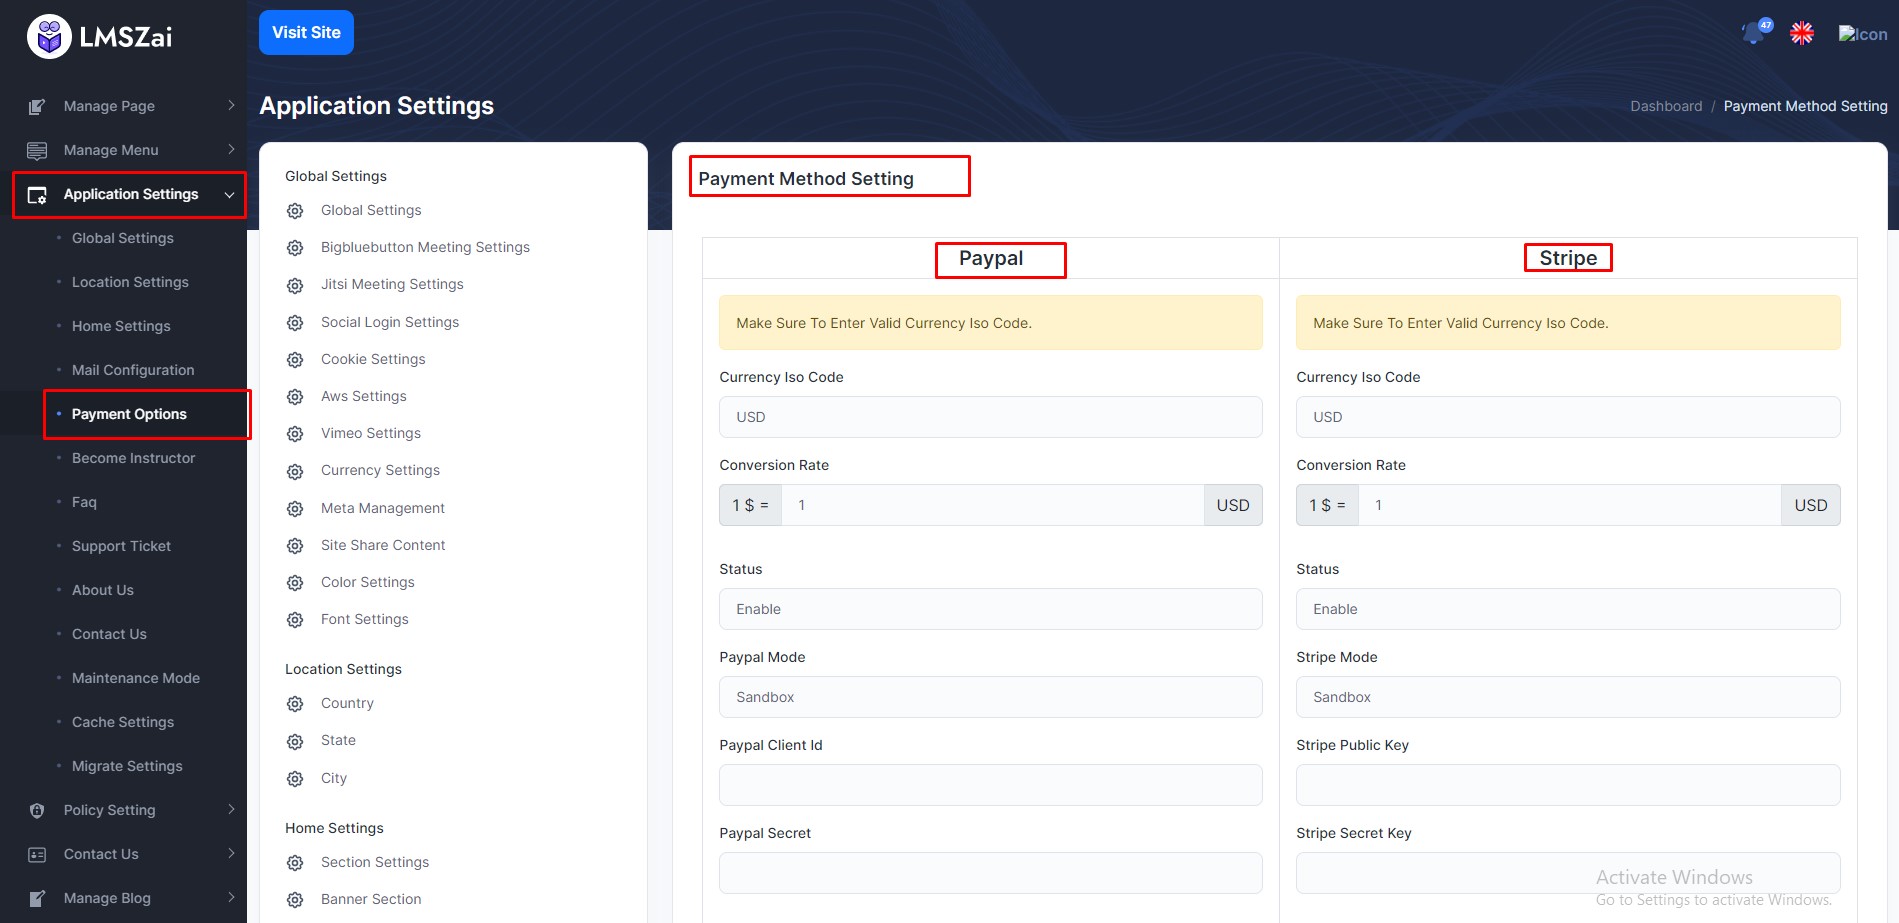
- Navigate to Application Settings → Payment Options → Payment Method
- For each payment gateway you want to enable:
- Toggle the status ON
- Enter the required API credentials (API Key, Secret Key, Merchant ID, etc.)
- Select the appropriate mode (Test/Sandbox or Live)
- Configure any additional settings
- Click Update to save the settings
Testing Payment Gateways
- Always test with test/sandbox credentials first
- Make a test purchase with a small amount
- Verify the payment processes correctly
- Check that course enrollment occurs after successful payment
- Only switch to live credentials after successful testing
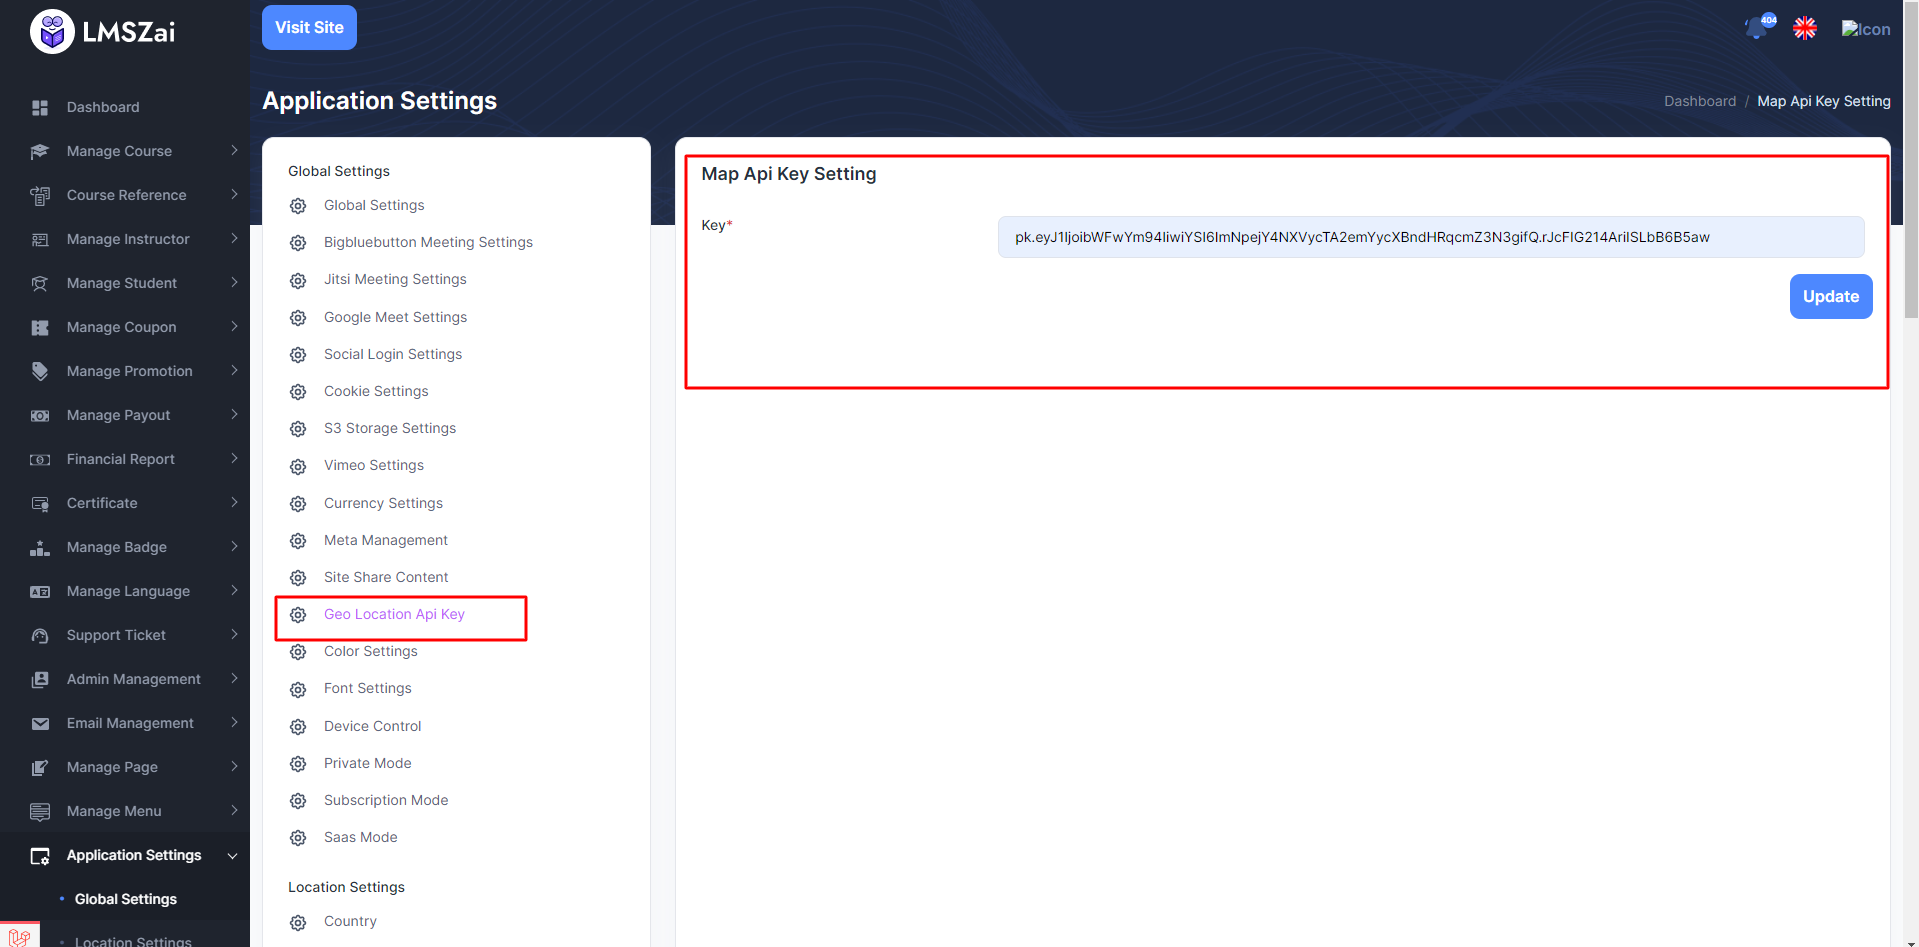
Geo-location (MapBox Integration)
Overview: Geo-location feature allows you to add location information to user profiles and filter instructors or content based on geographic location. This is particularly useful for platforms that want to connect local instructors with students.
Benefits: - Location-based instructor filtering - Enhanced user profiles - Local course discovery - Geographic analytics
Prerequisites
- A MapBox account (free tier available)
- MapBox API key
- Admin access to your LMSZAI installation
Configuration Steps
Step 1: Create MapBox Account
- Visit MapBox
- Sign up for a free account
- Verify your email address
Step 2: Get MapBox API Key
- Log in to your MapBox account
- Navigate to your Account page
- Copy your Default Public Token or create a new access token
- Ensure the token has the necessary scopes (typically
styles:read,fonts:read,datasets:read)
Step 3: Configure in LMSZAI Admin Panel
- Log in to your LMSZAI admin panel
- Navigate to Application Settings → Global Settings → Geo Location API Key
- Paste your MapBox API Key in the designated field
- Click Update to save the settings
Usage
After configuration, users (especially instructors) can add their location information to their profiles. This location data can then be used to filter and display instructors based on geographic proximity.
Bank Payment Gateway
Overview: Bank payment gateway allows you to accept direct bank transfers as a payment method. Admins can add multiple bank account details, and students can choose to pay via bank transfer during checkout. This is particularly useful in regions where online payment gateways are not widely used.
Benefits: - Additional payment option for users - No transaction fees (typically) - Suitable for high-value transactions - Local payment preference support
Prerequisites
- One or more bank accounts
- Bank account details (account number, bank name, routing number, etc.)
- Admin access to your LMSZAI installation
Configuration Steps
Step 1: Prepare Bank Information
Gather the following information for each bank account you want to add: - Bank name - Account holder name - Account number - Branch name - Routing/SWIFT code (if applicable) - IBAN (International Bank Account Number, if applicable) - Bank address (optional) - Any additional instructions for students
Step 2: Configure in LMSZAI Admin Panel
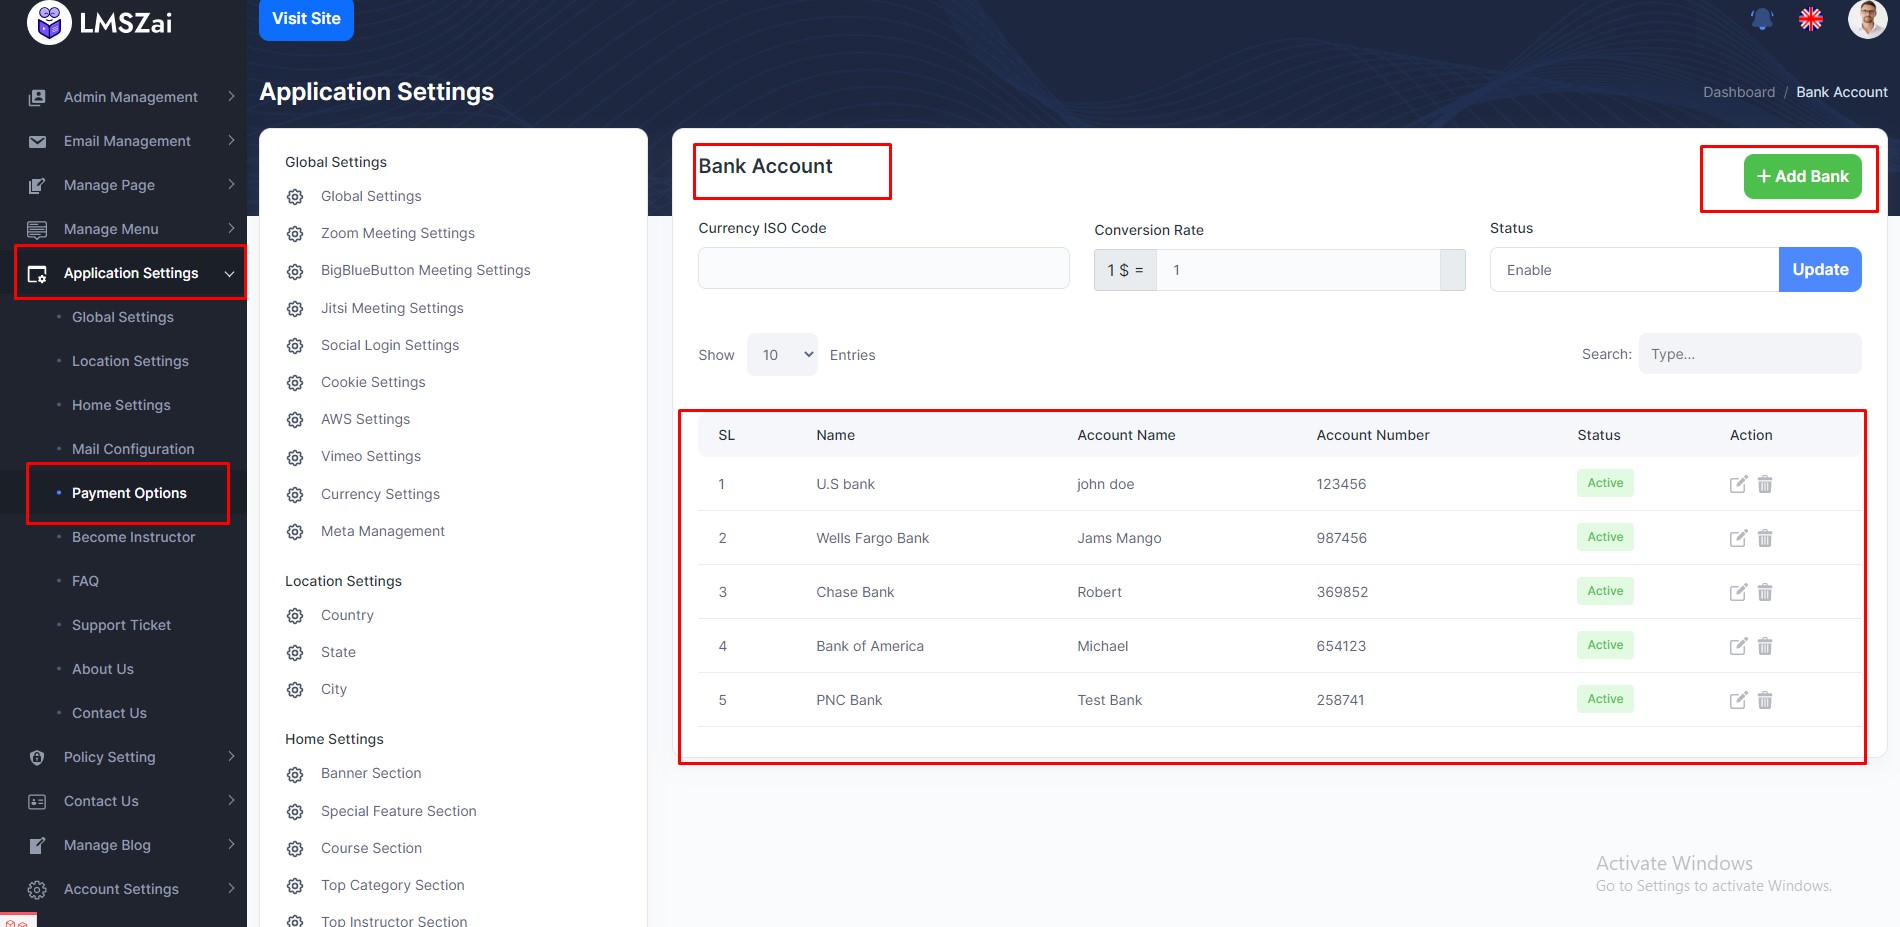
- Log in to your LMSZAI admin panel
- Navigate to Application Settings → Payment Options → Bank
- Enable Bank Payment status by toggling it ON
- Click Add Bank or similar button
- Fill in the bank account details:
- Bank name
- Account holder name
- Account number
- Branch name
- Other relevant details
- Add any special instructions for students (e.g., "Include order ID in transfer description")
- Save the bank information
- Repeat for additional bank accounts if needed
Payment Process
- During checkout, students can select "Bank Transfer" as the payment method
- Students will see the bank account details you've configured
- Students make the bank transfer with the order/transaction reference
- Admin manually verifies and confirms the payment in the admin panel
- Course access is granted after payment confirmation
Note: Bank payments typically require manual verification, so ensure you have a process to check bank statements and confirm payments promptly.
Mail Configuration (Gmail SMTP)
Overview: Mail configuration allows your LMS to send transactional emails (registration confirmations, course enrollment notifications, password resets, etc.) using SMTP. This guide covers Gmail SMTP configuration, which is one of the most commonly used email services.
Benefits: - Reliable email delivery - Professional email communications - Transactional email automation - Email notifications for important events
Prerequisites
- A Gmail account (Google Workspace account recommended for business use)
- Two-factor authentication enabled (recommended)
- Admin access to your LMSZAI installation
Important Notes
Two-Step Verification: If you have two-step verification enabled on your Google account, you'll need to generate an "App Password" instead of using your regular Gmail password. App passwords are special passwords designed for applications that don't support two-step verification.
Why App Passwords? Some applications may be blocked from accessing your Gmail account due to two-step verification. An app-specific password allows these applications to access your mail account securely.
Configuration Steps
Step 1: Enable Two-Step Verification (If Not Already Enabled)
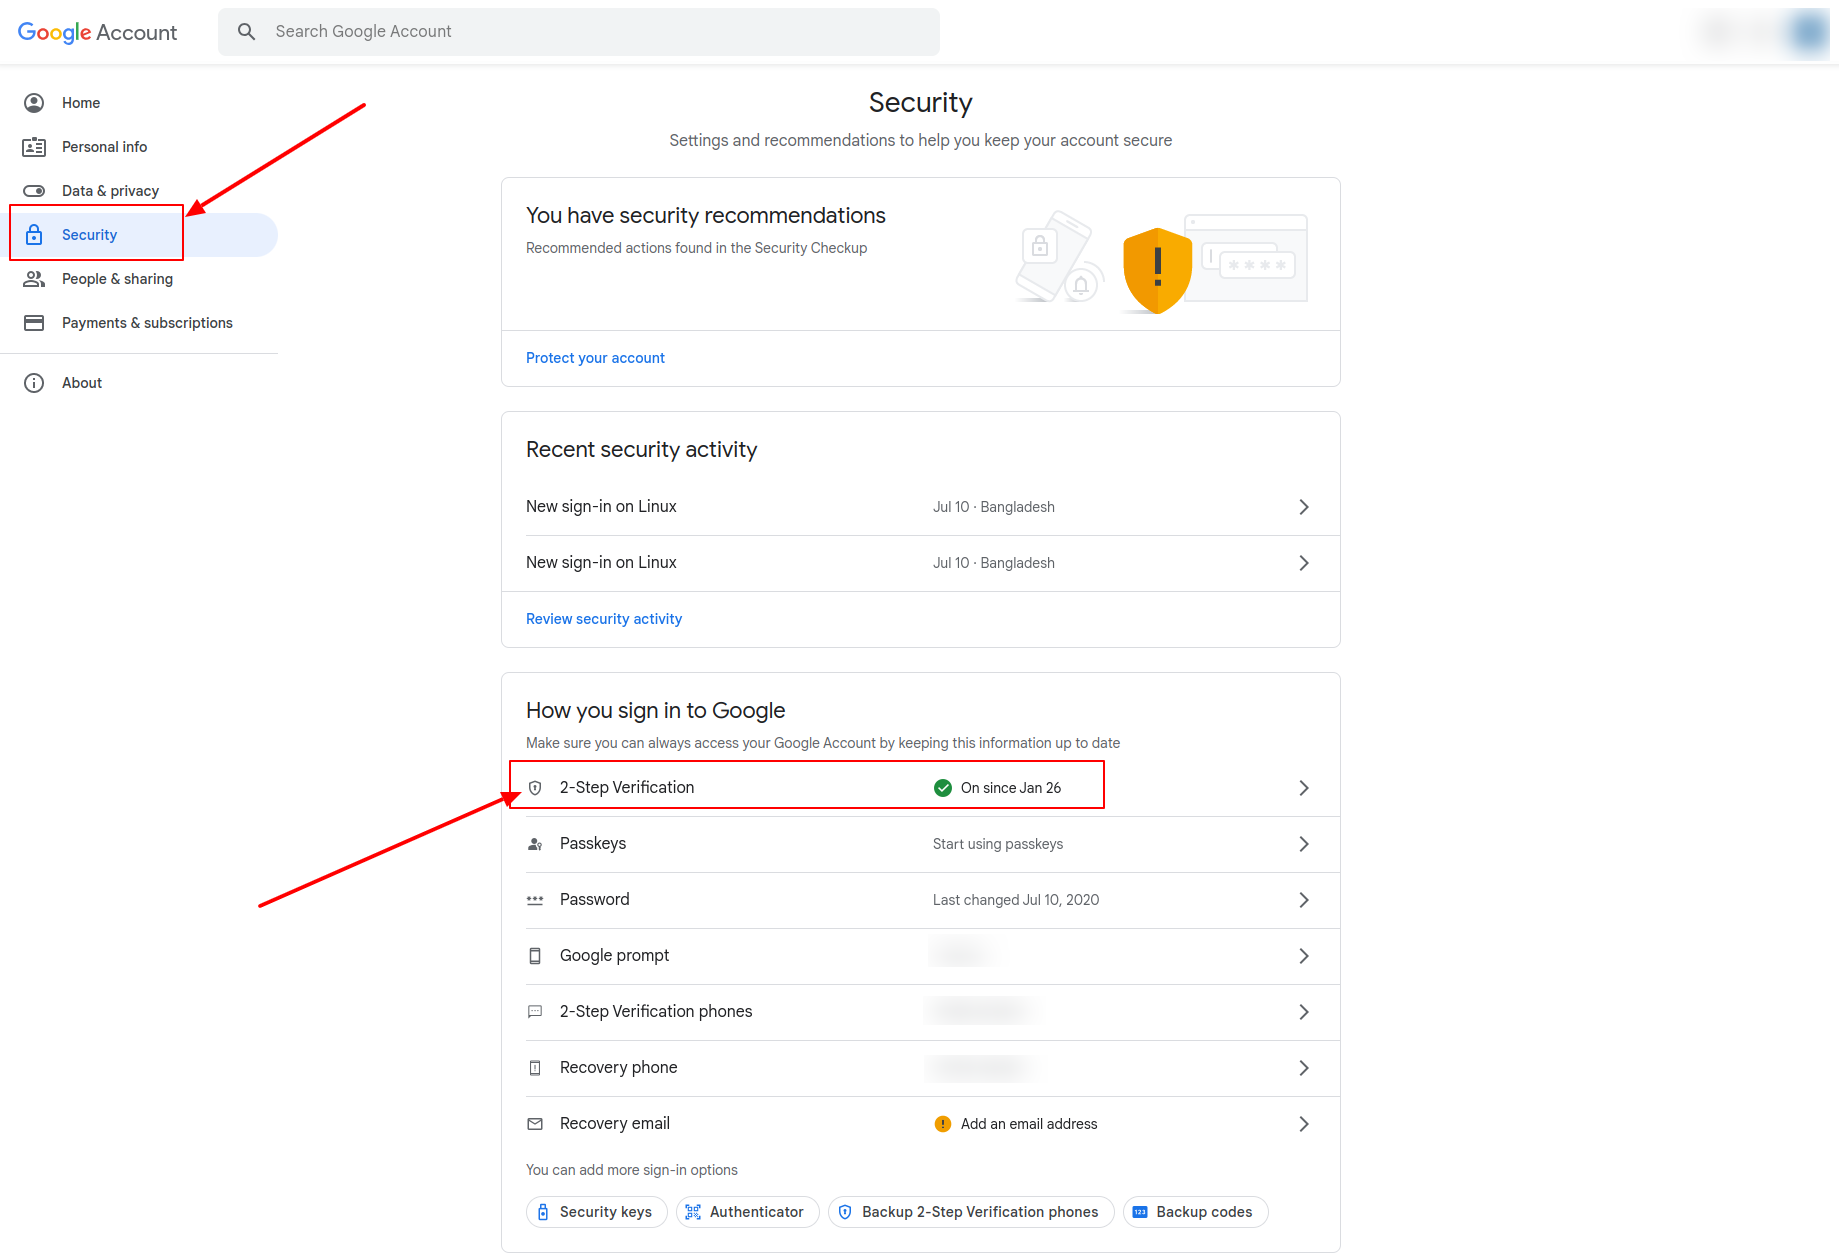
- Go to your Google Account
- Navigate to Security in the left panel
- Under Signing in to Google, find 2-Step Verification
- Follow the prompts to enable two-step verification if it's not already enabled
Step 2: Generate App Password
If you don't have two-step verification enabled, you can skip this section and use your regular Gmail password. However, using an app password is recommended for better security.
- Go to your Google Account
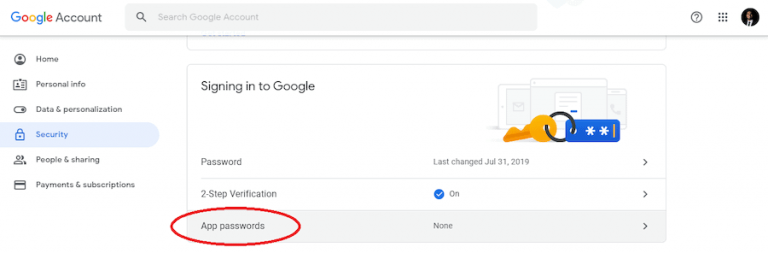
- Navigate to Security in the left panel
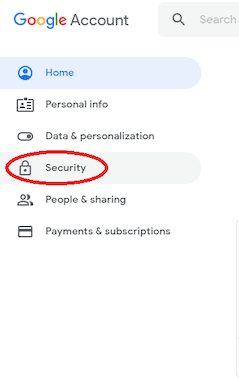
- Under Signing in to Google, click on App Passwords
If you don't see the App Passwords option, it might mean: - Two-step verification is not set up for your Google account - Two-step verification is set up for security keys only - Your account is managed through work, school, or another organization - Advanced Protection is enabled for your account
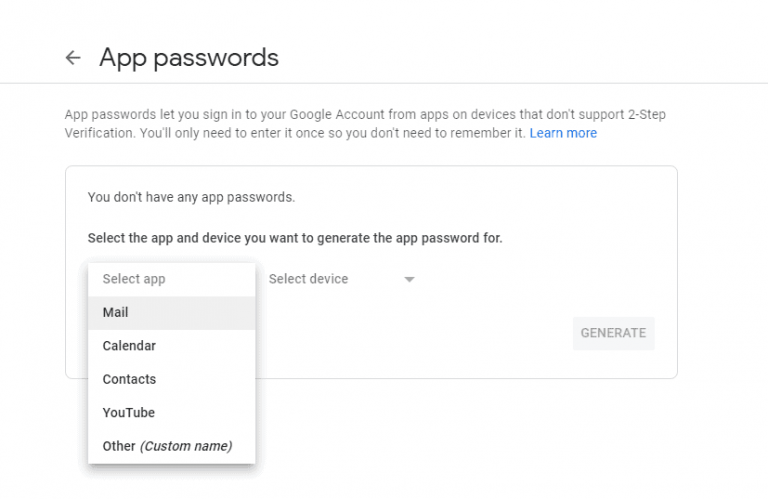
- Click Select app and choose Mail (or Other if Mail is not listed, then type "LMSZAI" or "SMTP")
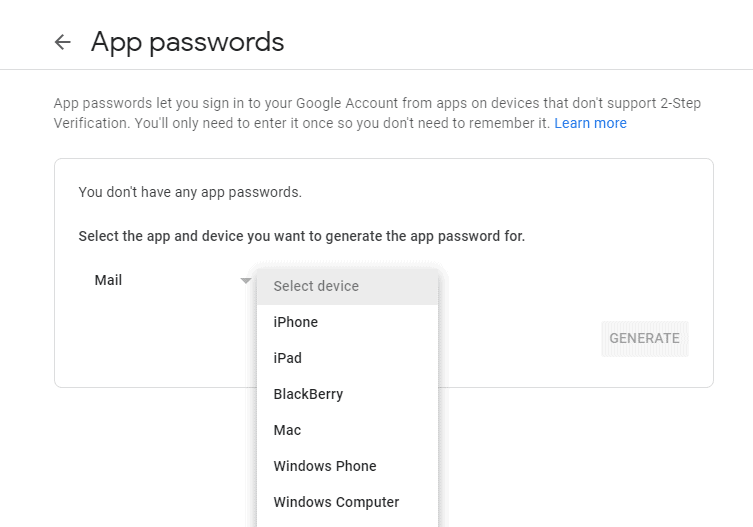
- Click Select device and choose the device you're using (or Other and type a name)
- Click Generate
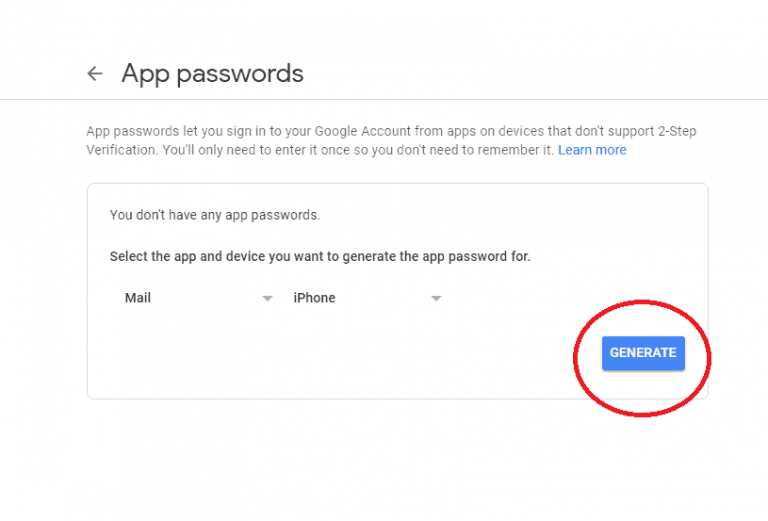
- A 16-character password will be generated. Copy this password immediately - you won't be able to see it again. The password will appear in a yellow bar with spaces (e.g.,
xxxx xxxx xxxx xxxx)
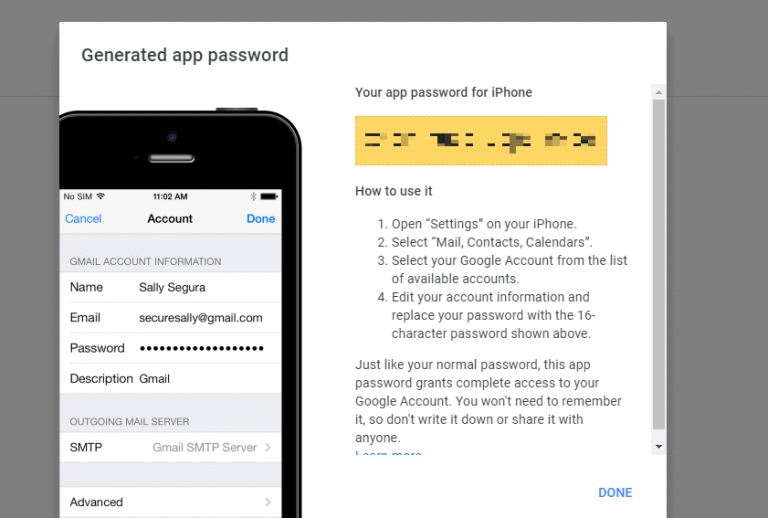
- Click Done
Note: You won't need to remember this App Password since you'll only use it once to configure your application. Store it securely until you've completed the configuration.
Step 3: Configure SMTP in LMSZAI Admin Panel
- Log in to your LMSZAI admin panel
- Navigate to Application Settings → Global Settings → Mail Configuration (or similar)
- Configure the following SMTP settings:
Gmail SMTP Settings:
- Mail Driver: SMTP
- SMTP Host: smtp.gmail.com
- SMTP Port: 587 (TLS) or 465 (SSL)
- Encryption: TLS (for port 587) or SSL (for port 465)
- SMTP Username: Your Gmail address (e.g., [email protected])
- SMTP Password:
- If using App Password: Paste the 16-character app password (remove spaces)
- If not using 2FA: Use your Gmail password
- From Email Address: Your Gmail address
- From Name: Your organization/LMS name
- Click Update or Save to save the settings
Step 4: Test Email Configuration
- Send a test email through your LMS system
- Check your inbox (and spam folder) to verify the email was received
- Verify the "From" address displays correctly
- If emails are not sending, check:
- SMTP credentials are correct
- App password was copied correctly (no extra spaces)
- Firewall is not blocking SMTP ports
- Gmail account doesn't have login restrictions
Alternative Email Providers
While this guide covers Gmail, you can configure other SMTP providers using similar steps: - Outlook/Hotmail: smtp-mail.outlook.com, Port 587 - Yahoo: smtp.mail.yahoo.com, Port 587 - SendGrid: smtp.sendgrid.net, Port 587 - Mailgun: smtp.mailgun.org, Port 587 - Amazon SES: email-smtp.[region].amazonaws.com, Port 587
Each provider will have specific requirements for authentication and configuration.
Troubleshooting Common Issues
Social Login Not Working
- Issue: Users cannot log in with Google/Facebook
- Solutions:
- Verify redirect URIs match exactly (including http/https and trailing slashes)
- Check that credentials are copied correctly
- Ensure APIs are enabled in Google Cloud Console
- Verify app is not in testing mode with restricted users (Google)
Live Class Issues
- Issue: Live classes not starting or students cannot join
- Solutions:
- Verify API credentials are correct
- Check server status of the live class provider
- Ensure proper permissions are granted
- Verify network/firewall settings allow connections
Payment Gateway Errors
- Issue: Payments failing or not processing
- Solutions:
- Verify API keys are correct (check for extra spaces)
- Ensure you're using test credentials for testing
- Check payment gateway account status
- Verify webhook URLs are configured (if applicable)
Email Not Sending
- Issue: Transactional emails not being delivered
- Solutions:
- Verify SMTP credentials
- Check spam folder
- Ensure App Password is correct (for Gmail with 2FA)
- Verify SMTP ports are not blocked
- Check email sending limits
S3 Storage Issues
- Issue: Videos not uploading to S3
- Solutions:
- Verify access keys are correct
- Check bucket permissions
- Ensure bucket name and region are correct
- Verify endpoint URL (for some providers)
- Check bucket exists and is accessible
Additional Resources
- LMSZAI Support - For additional help and support
- Getting Started Guide - Basic setup and installation
- Admin Documentation - Complete admin panel guide
Last Updated: Please refer to your LMSZAI version documentation for the most current information.